Rejection Candles: Reading the Wicks
A rejection candle is any bar whose wick records a failed probe: price pushed beyond a level, found nobody willing to keep paying there, and was pushed back before the close. The wick is not noise. It is the market's message about who got trapped. Every bar with a visible tail carries this information, and the skill is learning to read it at each position on the bar, not only on the textbook pin bar.

Think of a battering ram against a stone wall: the push, the hold, and the bounce backward, the wall announcing itself by what it does to the ram. The wick works the same way. Price charged into a zone, the zone held, and the retreat left a visible mark on the bar. The pin bar lesson covered the one-sided wick in full proportions, so this lesson widens the lens: every wick on every bar is a failed auction probe, and context decides what the failure means.
The Close Is the Proof
A wick only counts as rejection when the close lands back inside the range. Without that, the probe may simply be pausing, and the bar tells you nothing yet. The close is where the argument ends.
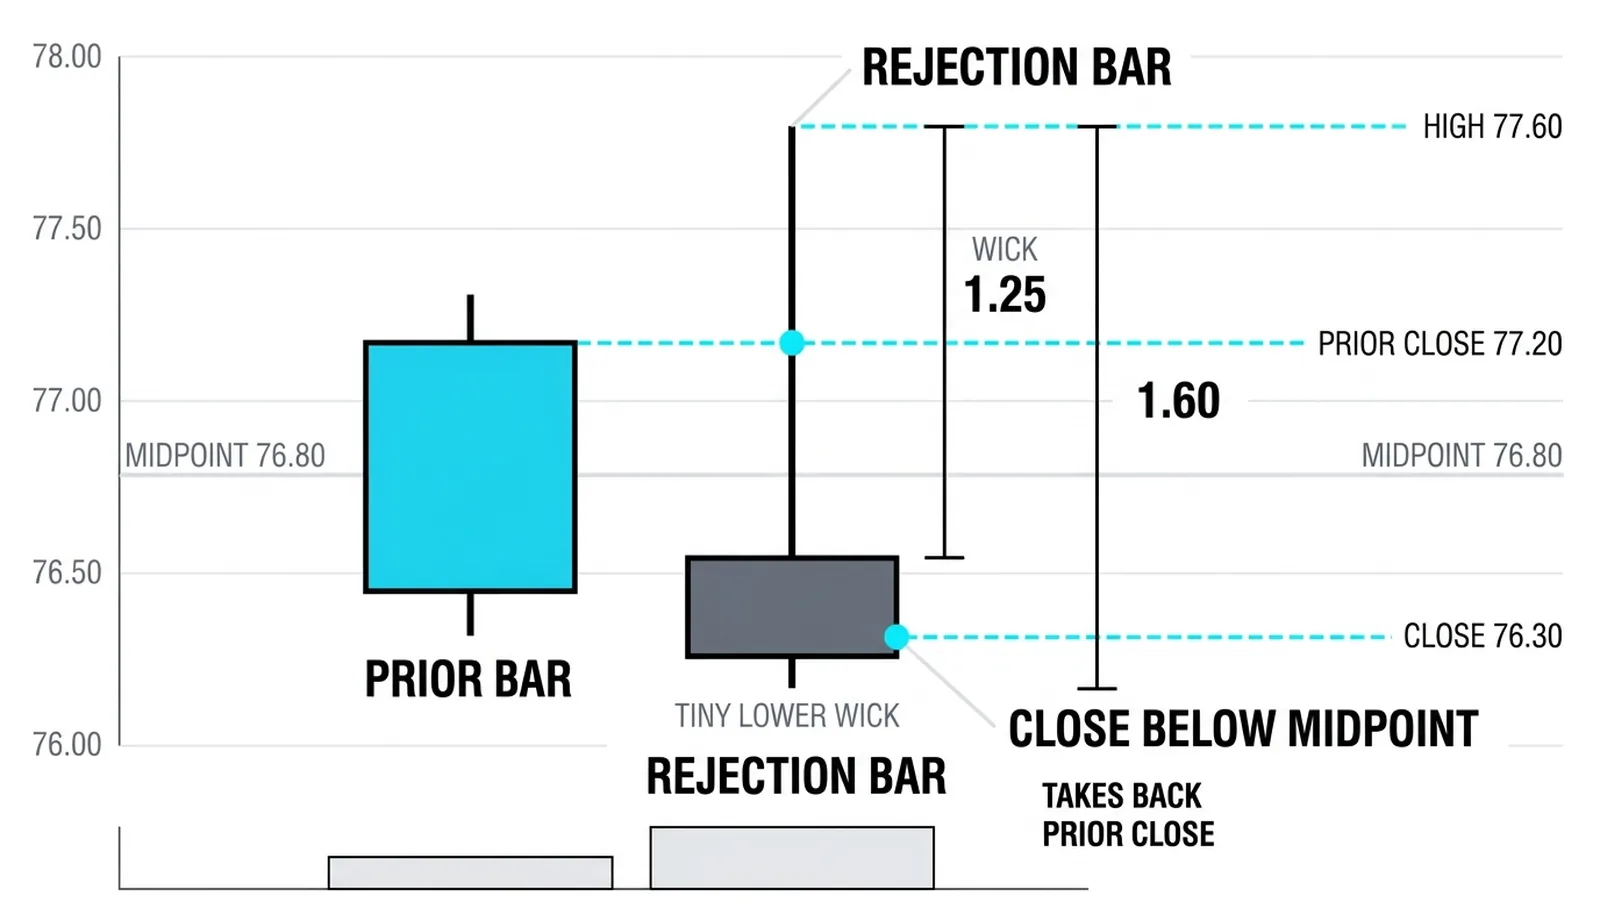
The price action canon sets the minimum for a reversal bar at a close above the bar's midpoint, for a bullish version, or below it for a bearish one. Anything less is a bar that probed and drifted, not a bar that rejected. The strong version, again by the tape-reading framework, shows three features together:
- A tail of one-third to one-half of the bar's total height, so the failed probe dominates the bar's story.
- A small or absent opposite wick, so the bar opened near one extreme and never wasted effort in the losing direction.
- A close that takes back the prior bar's close, so the rejection erases the previous session's progress rather than merely stalling it.
That third point matters more than most new traders expect. A long tail with a weak close is a question. A long tail with a close that swallows the prior close is an answer. The market refused the probe and reversed the ground the other side had already won.
Measure these proportions on the chart, not in your head. A tail that feels dramatic on a fast chart is often a quarter of the bar, and a quarter of the bar is a drift, not a rejection.
The Message at Each Position
Position on the bar, and position on the chart, decide what the wick is saying. The same shape in different places carries opposite meanings.
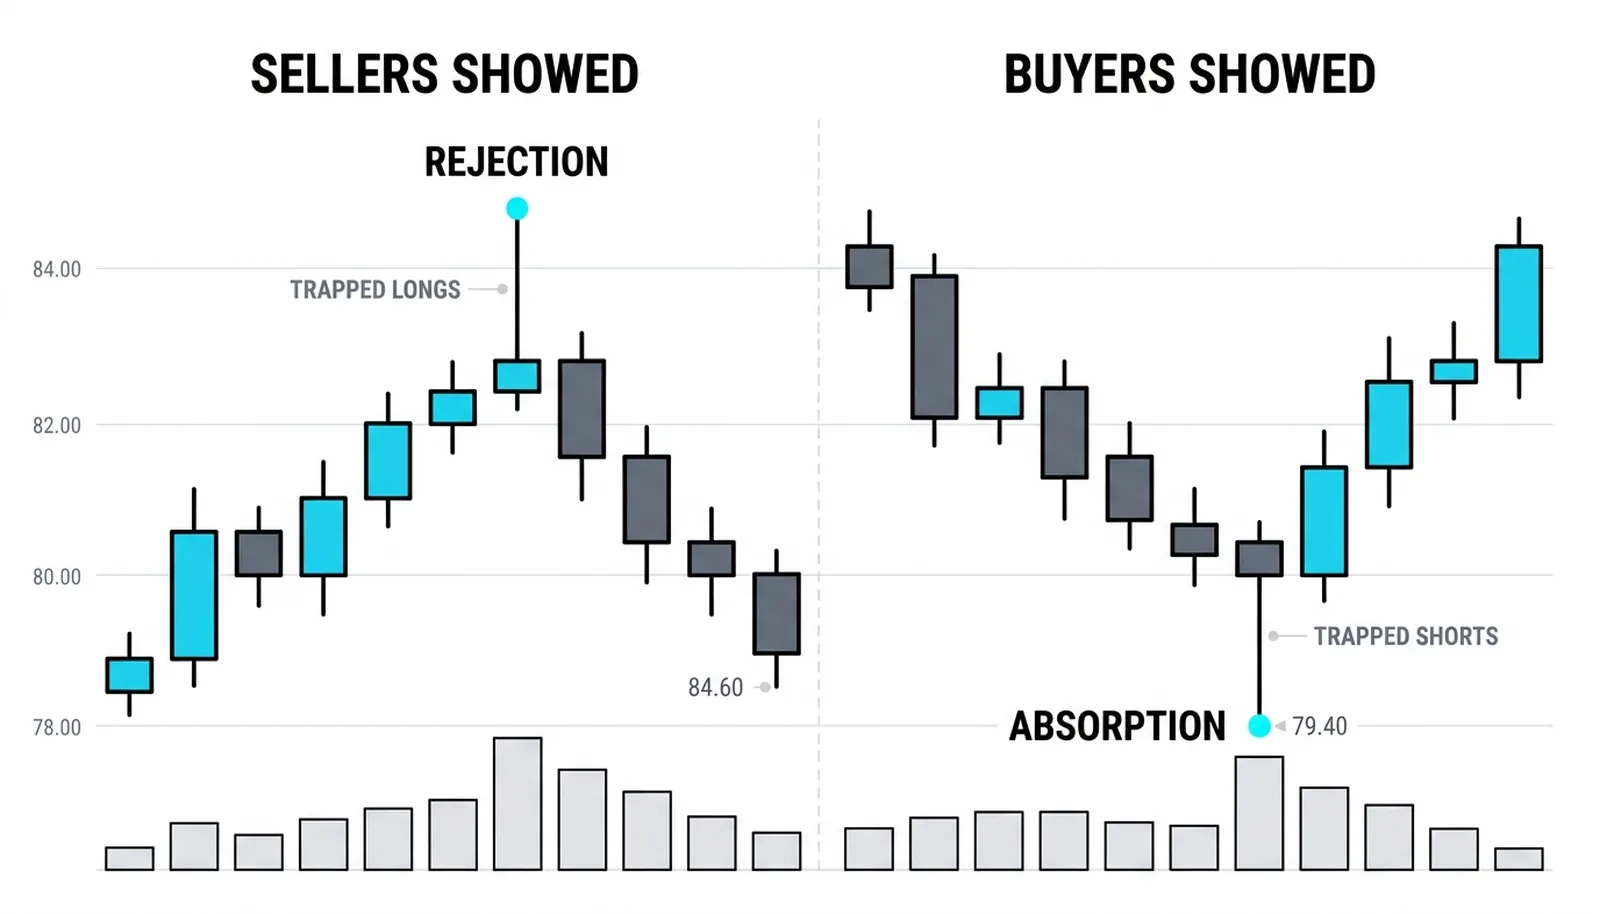
A long upper wick at a high after a run is supply appearing. Buyers pushed price into new territory, sellers met them there in size, and the close came back down. Everyone who bought inside that upper tail is now holding a losing position, and those trapped buyers become fuel if price falls, because their exits add selling.
A long lower wick at a low after a decline is the mirror image. Sellers pressed into fresh lows, demand absorbed the push, and the close recovered. The traders who sold inside that tail are trapped short, and their covering can power the bounce.
Both-end wicks on a small body, the spinning tops, mean two-sided rejection. Both directions were probed and both failed. That is the signature of a range, not a turn. Neither side could hold new ground, so the market is telling you it is balanced, and balanced markets chop up anyone trading them as trends.
Then there is the special case: a large bar with a huge top tail, often a big bottom tail too, compressed into one session. This is a spike up and a spike down inside a single bar. The price action canon's rule of thumb is that big moves in both directions within one bar leave the market confused, and confused markets usually go sideways for a while. Do not read that bar as a reversal signal. Read it as a warning that the next several bars may be noise.
Trading the Wick, Not the Wish
The wick never trades alone. It needs a location, meaning a level where a rejection matters, and it needs the run that preceded it, because rejection after a long move carries information that rejection in the middle of nowhere does not. This is exactly the discipline the pin bar lesson built, and it applies to every wick you will ever read.
Entries come in two standard forms. The patient entry takes the next bar's open after the rejection bar closes. The confirmation entry waits for a break of the wick bar's body-side extreme, demanding that price actually start moving in the rejection's direction before money goes in.
The stop lives beyond the wick tip. The logic is structural, not arbitrary: the wick tip is the price the failed probe reached and the market refused. If price trades back through that tip, the rejection story is void, because the level demonstrably did not hold. There is no argument for staying in a trade whose reason has been disproven.
Now the honesty. One wick is one failed probe, not a promise. Most probes at a level fail to reverse anything, and the market very often returns to test the very price that rejected it, sometimes more than once. The trader counts the wick as evidence, then waits for the close and the follow-through to confirm. Treating every long tail as a turning signal is one of the fastest ways to donate money to patient traders.
The Probe to 118.60
Suppose a stock rallies into a prior high near 118.00 and prints a rejection bar with these hypothetical numbers: open 117.20, high 118.60, low 117.00, close 117.35.
Read the anatomy first. The total range is 1.60. The upper wick runs from the 117.35 close region up to 118.60, a tail of about 1.25, roughly three-quarters of the bar. The close sits in the lower third, well below the midpoint, which the bar's anatomy requires for a valid rejection. This is a strong bearish rejection: buyers probed above the old high and got trapped, and the close confirmed the failure.
The conservative short triggers on a break back below 116.95, just under the bar's low, so the trade only activates if sellers actually follow through. The stop sits at 118.70, just above the wick tip, because a trade back above 118.60 proves the probe zone did not hold. Risk per share is 1.75, the distance from 116.95 to 118.70.
The target is the mid-swing support at 113.95, a gain of 3.00 from the entry. That is roughly 1.7 times the risk, a workable ratio for a counter-move trade at a level.
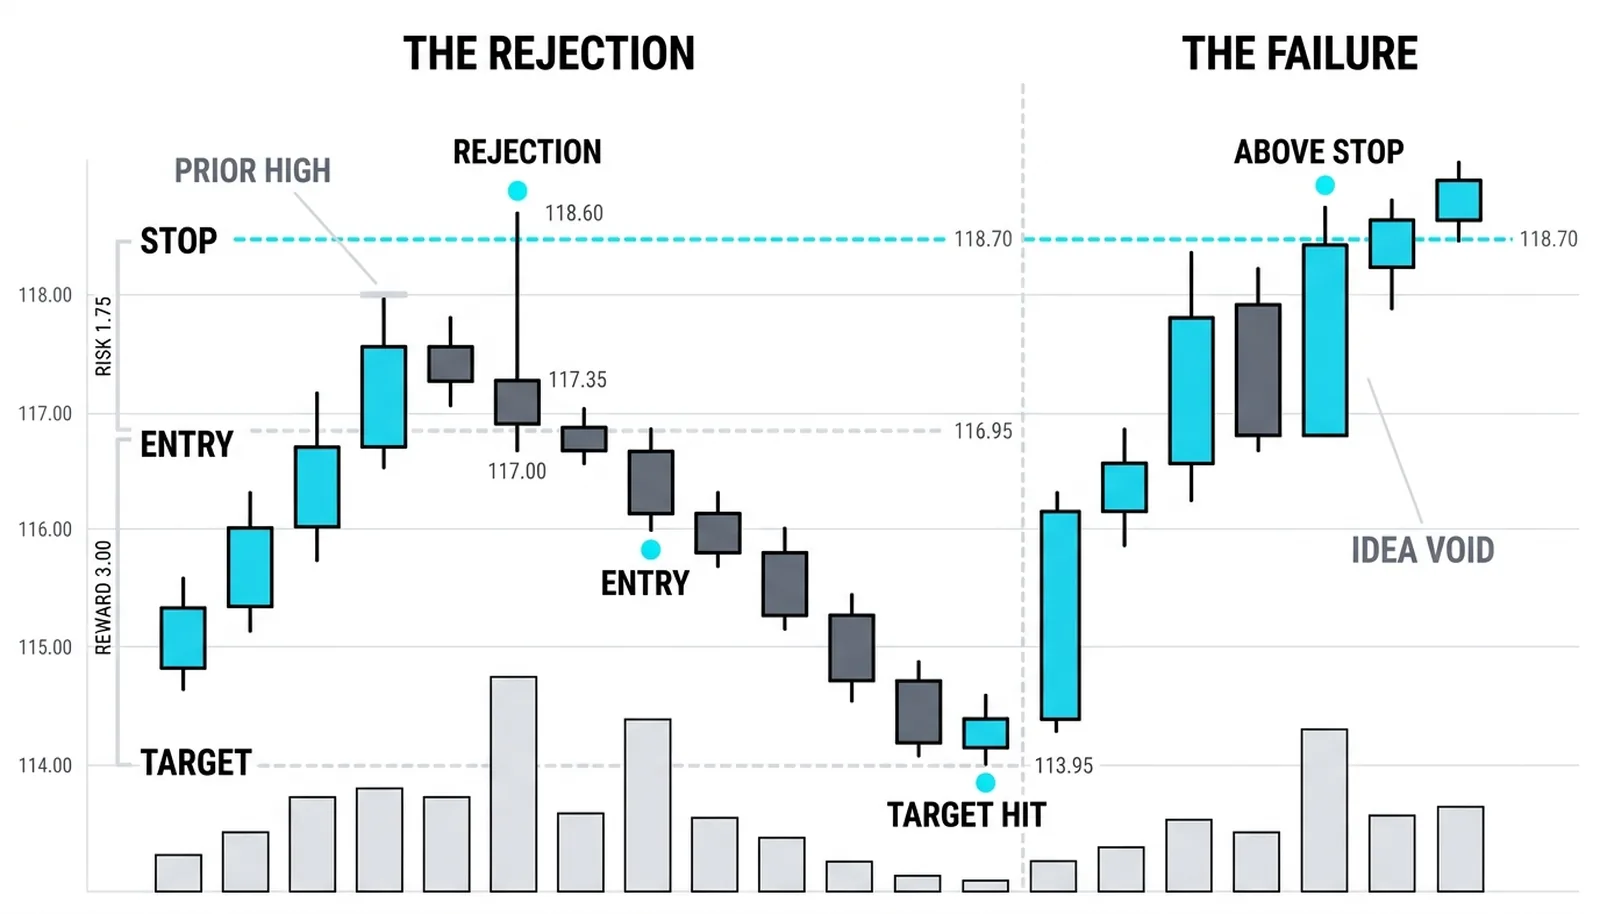
Now the failed version, because it happens constantly. The next session rallies and closes above 118.70. The rejection is void. The level did not hold, the trapped buyers were released, and the short idea is gone before it ever triggered. The trader who understood the wick as evidence, not a promise, loses nothing. The trader who shorted the tail itself, early and without the trigger, is now the trapped one.
| Wick position | The failed action | Who is trapped | What to watch next |
|---|---|---|---|
| Long upper wick at a high after a run | Buyers probed above a level and were pushed back down | Late buyers inside the tail | A close below the bar's midpoint and follow-through lower |
| Long lower wick at a low after a decline | Sellers probed below a level and were absorbed | Late sellers inside the tail | A close above the midpoint and follow-through higher |
| Wicks on both ends, small body | Both directions probed, both failed | Both sides, briefly | Range behavior; stand aside or trade the range edges |
| Huge top tail on a large bar | A spike up and a spike down in one session | Everyone who chased either spike | Sideways chop; wait for the market to pick a side |
Rejection Candle Questions, Answered
What is a rejection candle?
A rejection candle is any bar whose wick shows a failed probe: price moved beyond a level, found no business there, and closed back inside the range. The wick records the attempt and the refusal, and the close confirms which side won the argument.
Does a long wick always mean a reversal?
No. A long wick means a probe failed, nothing more. Most failed probes lead to a pause or a retest rather than a turn. Reversal requires the right location, a preceding run to reverse, a strong close, and follow-through on the next bars.
What is the difference between a rejection candle and a pin bar?
A pin bar is one strict pattern: a one-sided wick of defined proportions with a small body at one end. A rejection candle is the wider category. Every pin bar is a rejection candle, but any wick on any bar is a rejection read if the close confirms the probe failed.
Where does the stop go on a wick trade?
Beyond the wick tip. The tip is the price the market refused, so a trade back through it disproves the rejection. A stop placed inside the bar's range gets hit by ordinary noise; a stop beyond the tip is only hit when the trade idea is genuinely wrong.
The next lesson moves from single bars to pairs: the two-bar reversal, where the second bar's job is to prove what the first bar only suggested.