Pin Bar: the Anatomy of Rejection
Rejection is the entire idea behind a pin bar: one bar where price reached into new territory, the crowd refused to keep paying, and the bar closed back near the opposite end. The shape is simple. A long wick pokes beyond the surrounding price area, and a small body sits at the far end of the range. The wick is the exact printed record of where buyers or sellers said no, and the close is the proof that the refusal held through the end of the bar.

Think of a hand on a hot stove: the touch is fast, the withdrawal is immediate, and nobody keeps the hand there to argue. That is the psychology in one image. Price touched a level, the touch hurt, and the retreat was instant.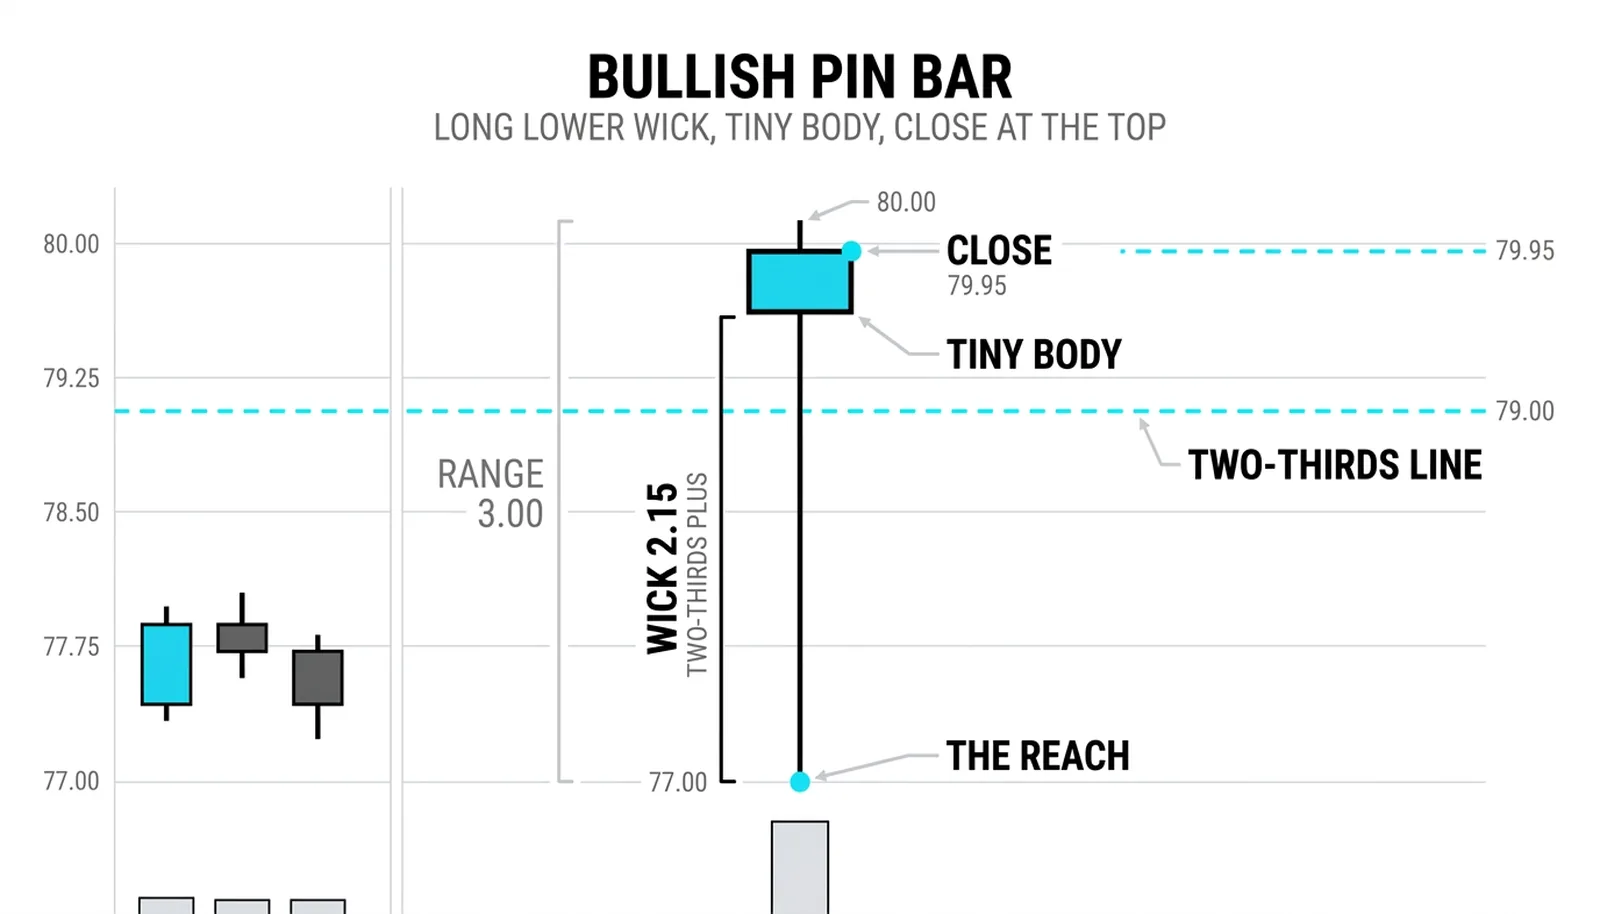
The Structure in Proportions
A pin bar is defined by proportions, not vibes. The wick, the part that did the reaching, must dominate the bar. The working rule is at least two-thirds of the total range on the rejection side. If the bar spans 3 points, the long wick should account for at least 2 of them. The body and the opposite wick share whatever remains, and they should share very little.
The close matters as much as the wick. It must sit back near the end opposite the long wick, ideally in the top or bottom third of the range depending on direction. A bearish pin bar closes near its low after spiking up. A bullish pin bar closes near its high after dipping down.
A bar with a long wick and a big body is a different animal. That shape says the reaching side lost some ground but the fight continued, and the outcome stayed mixed. The pin bar's message depends on the body being small, because the small body is the evidence that the rejection was decisive rather than partial.
Three things disqualify the shape outright:
- The wick covers less than two-thirds of the range, so the rejection is not dominant.
- The close lands in the middle of the bar, so the refusal never got confirmed.
- The bar sits inside the previous bar's range, so nothing was actually reached for.
The price action canon treats these rejection bars as signal bars, and it reads the tail as the single most honest part of the bar because it shows business that was transacted and then abandoned. That framing is worth keeping. The wick is real money changing hands at prices the market then repudiated.
The Level Makes the Pattern
Location decides everything. The same pin bar shape in the middle of a range is noise, a random probe that means nothing because nothing was at stake. The same shape at a well-marked level, after a run into that level, is a signal, the sorting the reversal-versus-continuation lesson already practiced. The earlier lesson on context made this argument for patterns in general, and the pin bar is the clearest case of it.
The run before the bar is part of the pattern. A pin bar works because traders chased a move into a level and got caught. No run means nobody chased, and nobody trapped means no fuel for the reversal. Look for price traveling into a prior high or low, a trendline, or a round number that has been respected before.
The psychology is mechanical. A long upper wick at a high leaves everyone who bought the poke underwater within minutes. Their exits are sell orders, and those exits are the supply that pushes price down. A long lower wick at a low is the mirror image: sellers who shorted the breakdown are trapped, and their buy-backs become the demand that lifts price.
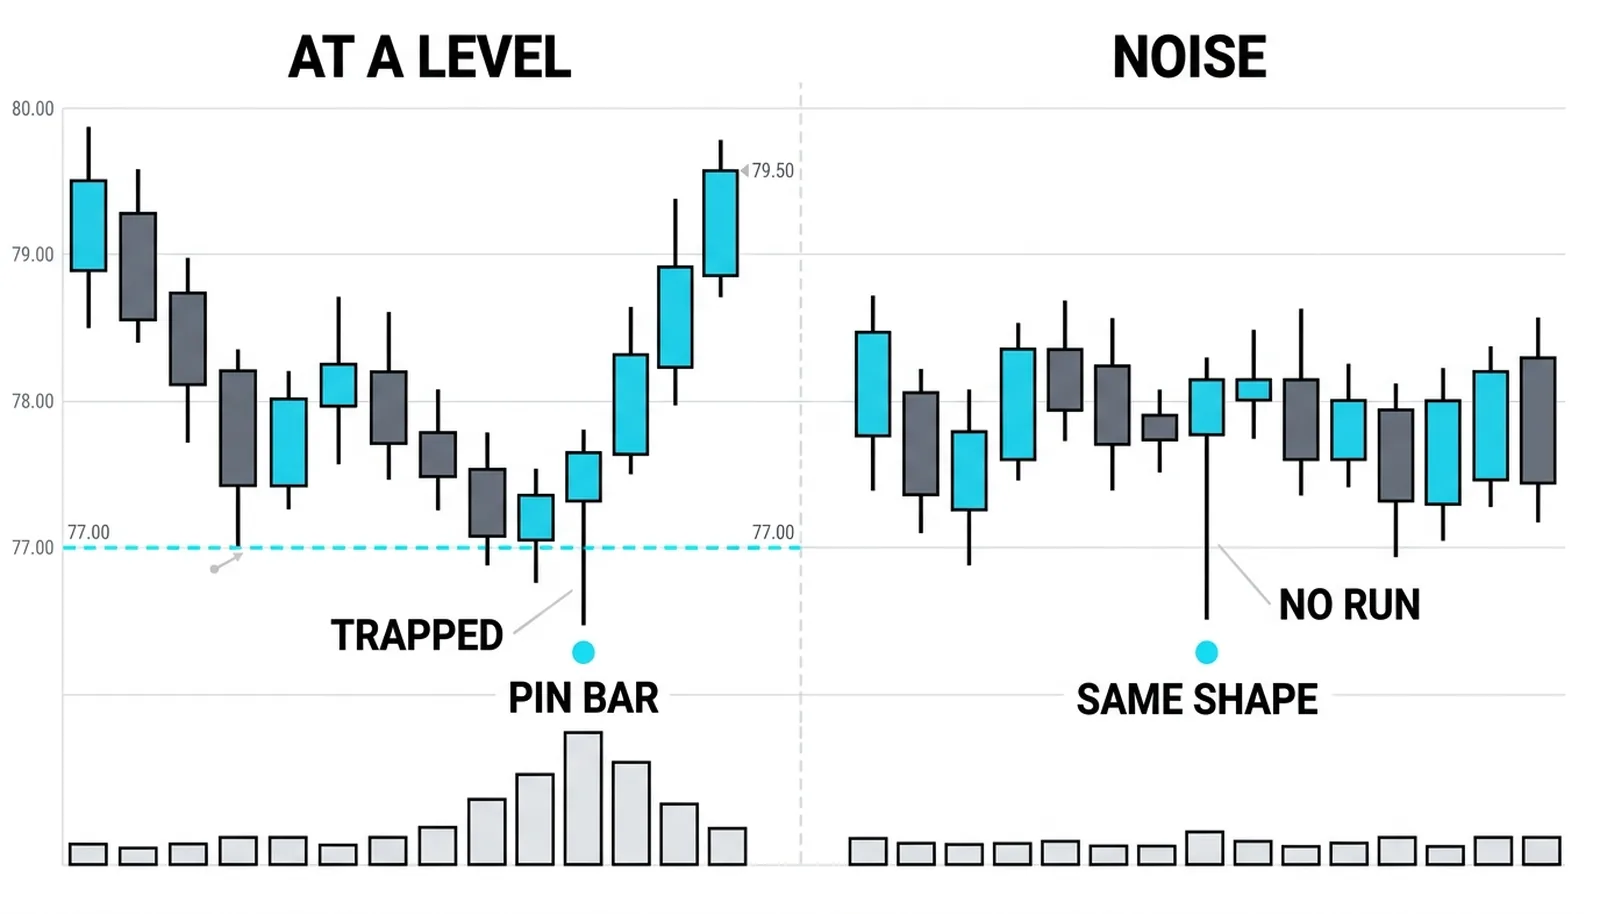
The pattern is not magic; it is a map of trapped traders, and trapped traders are forced flow.
Trading It Without Guessing
There are two honest entries, and the choice between them is a choice about how much proof you demand.
The aggressive entry takes the next bar's open, or a break of the pin bar's body in the direction of the rejection. It gets the best price and the worst information. You are betting the rejection holds before the market has confirmed anything.
The conservative entry waits for the break of the pin bar's extreme on the body side. For a bearish pin, that means shorting the break of the pin bar's low. For a bullish pin, buying the break of the pin bar's high. This costs a few points of slippage in exchange for printed proof that the rejection is being honored, that price is actually moving away from the rejected zone.
The stop lives beyond the wick tip. Always. The wick tip is the price the crowd refused, and if price trades back through it, the rejection story is dead. There is no argument for holding a trade whose entire premise has been violated. The stop placement is not a preference; it is built into the pattern's logic.
Targets should be set before entry, against structure. The prior swing low or high, the next level, or a fixed multiple of the risk all work. What does not work is deciding after the trade is on, when hope starts editing the plan.
Now the honesty. The shape alone is barely better than a guess. Traders who memorize the silhouette and trade every pin bar they see donate money steadily. The edge lives in the combination: the shape, the level, and the run that preceded it. Remove any one of the three and the statistics collapse toward guesswork.
The Tail at 64.10
Here is a worked example with invented round numbers, purely as an illustration.
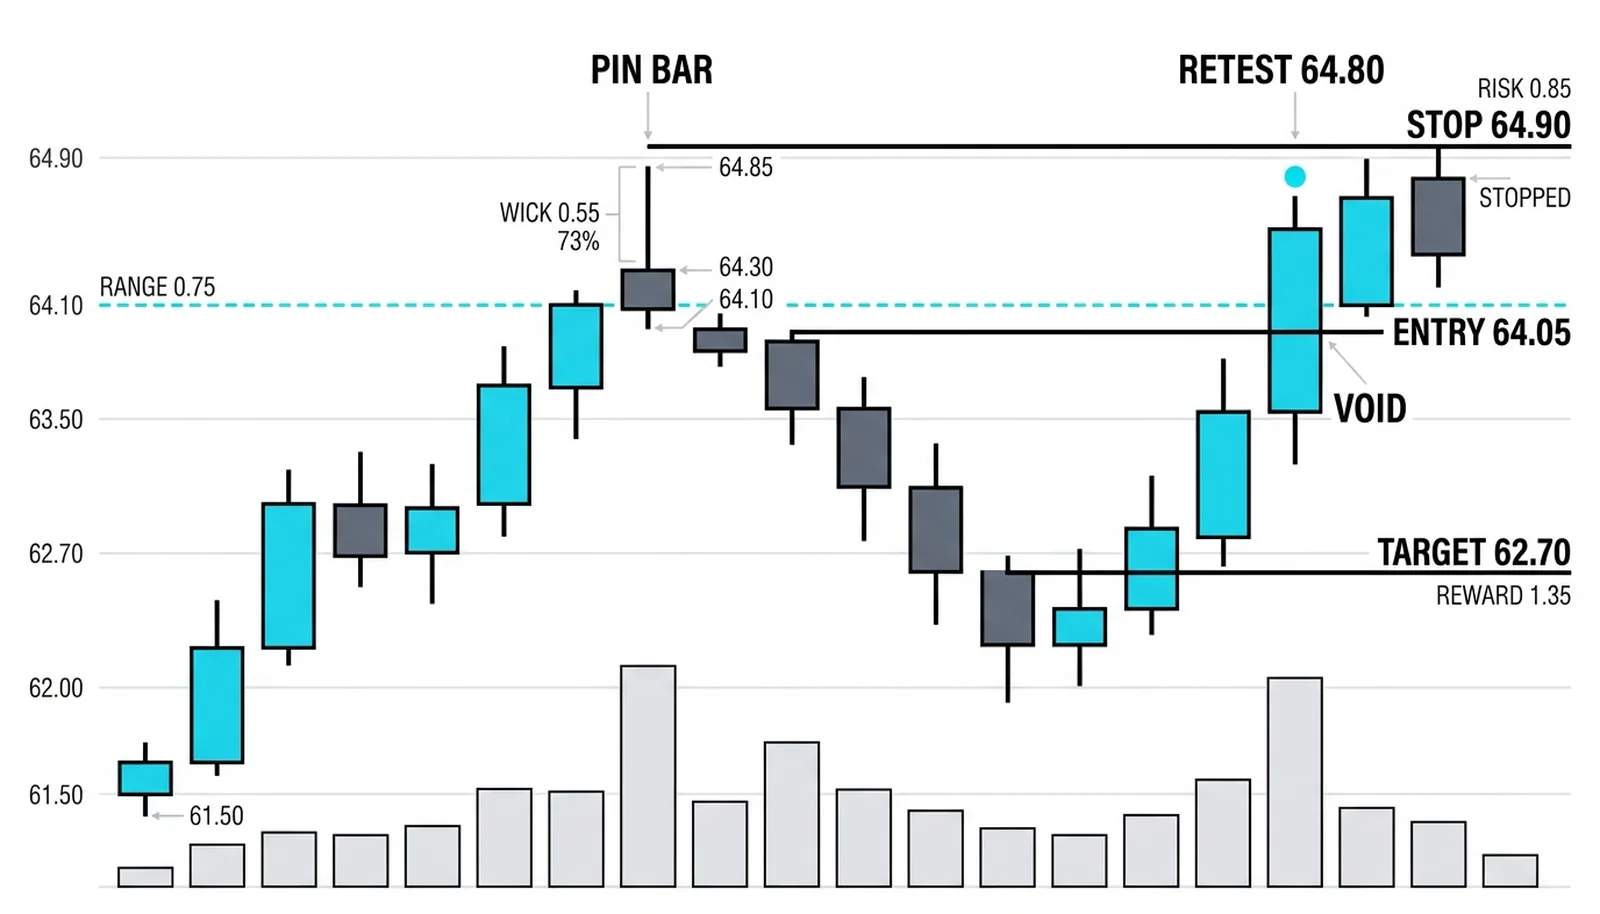
A stock rallies from 61.50 to 64.10 over several sessions and stalls at a prior high. One session prints the bar: it opens at 64.20, spikes to 64.85, sells off to 64.10, and closes at 64.30.
Measure it. The total range is 0.75, from 64.10 to 64.85. The upper wick runs from the 64.30 close area up to 64.85, a length of 0.55. That is 73% of the range on the rejection side, comfortably over the two-thirds rule. The body is small, the close sits near the low, and the bar formed at a prior high after a multi-day run. All three elements are present.
The conservative entry shorts the break back below 64.05, just under the pin bar's low. The stop sits at 64.90, above the wick tip. Risk is 0.85 per share. The first target is the prior swing low at 62.70, a reward of 1.35, roughly 1.6 times the risk. Acceptable, though not generous, and the trader would check whether a deeper target at the 61.50 origin of the run offers better math.
Now the failed version, because failed versions are the tuition. Two sessions later price retests 64.80 and closes above it. The rejection is void. Anyone still short is wrong by the pattern's own definition, and the stop at 64.90 takes the trade out for the planned 0.85 loss. The loss is the system working, not failing. A pin bar that gets overrun tells you the buyers absorbed the trapped sellers' exits and kept coming, which is itself useful information for the next setup.
| Bar part | The requirement | What it tells you | The common mistake |
|---|---|---|---|
| Long wick | At least two-thirds of the total range | Where the crowd refused to keep paying | Accepting a half-range wick as "close enough" |
| Small body | Close near the end opposite the wick | The rejection was decisive, not partial | Trading big-bodied bars as if they were pins |
| Location | At a level, after a run into it | Traders are trapped and must exit | Trading the shape mid-range where nothing is at stake |
| Stop | Beyond the wick tip | The exact price that voids the story | Tightening the stop inside the wick to cut risk |
Pin Bar Questions, Answered
What is a pin bar?
A pin bar is a single candlestick with a long wick covering at least two-thirds of its range and a small body closing near the opposite end. It records a probe into new prices that the market rejected within the same bar, leaving the traders who chased the probe trapped on the wrong side.
Does a pin bar need to be at a level?
Yes. Without a level and a preceding run, the shape is noise. The pattern's edge comes from trapped traders at a price that matters, and mid-range bars trap nobody of consequence.
Where does the stop go on a pin bar trade?
Beyond the wick tip. That price is the point the crowd refused, and a trade back through it voids the rejection entirely. Any tighter stop sits inside the pattern's own logic and will be hit by ordinary fluctuation.
How big should the wick be?
At least two-thirds of the bar's total range, with the close back near the opposite end. Bigger is generally better, because a longer wick means more traders were trapped at worse prices, which means more forced flow in your direction.
Next in this series, the inside bar takes the opposite posture: instead of a violent reach and rejection, it shows compression, a market going quiet inside the prior bar's range, and the trade is about which way the release comes.