How to Trade Harmonic Patterns
Trading harmonic patterns is a sequence run in order, and the phrase covers more than drawing the shapes: it means locating a structure, verifying its defining ratio, waiting for completion, entering by a rule chosen in advance, and managing the exit by levels set before the trade exists. Every skipped step in this method converts a located reversal into an unplanned one.

Dropping the anchor, the crew runs the sequence in order, approach checked, depth sounded, power cut, and only then does the anchor go down, because the sequence is what makes the holding spot a decision instead of a hope. Harmonic trading works the same way. The pattern is the holding spot. The checklist is the sequence that makes it real.
The four pattern lessons each gave one structure and one worked trade, and this lesson is the shared practice underneath all of them, the same checklist applied to any pattern in the set. If the bat, butterfly, crab, and shark lessons are still fresh, nothing here re-teaches them. What follows is the discipline that makes any of them tradable.
The Sequence
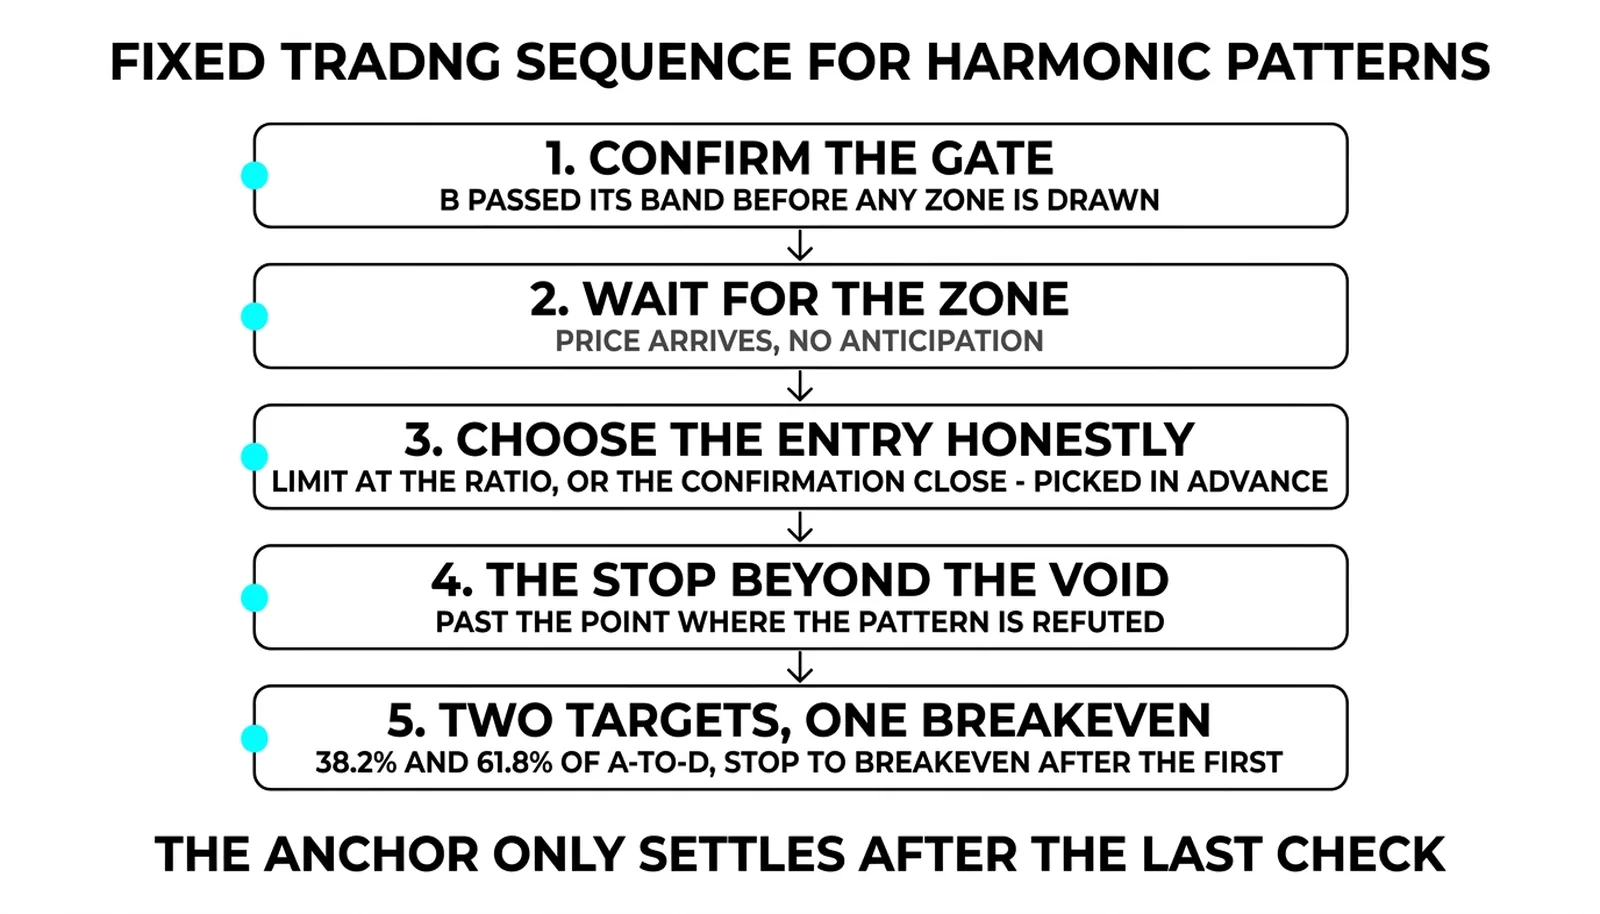
The checklist has five steps, and they run in a fixed order. Skipping ahead is the most common way harmonic traders lose money, because each step assumes the one before it passed.
Step one: confirm the defining gate. Each pattern lives or dies on its B point rule. The bat requires a B near the 50 percent retracement of the X-to-A leg. The butterfly requires B near 78.6 percent. The crab requires a moderate pullback before a deep extension. A structure that fails its gate is not a variant. It is nothing, and no amount of later beauty at the D point rescues it.
Step two: wait for completion. The potential reversal zone is a place, not a schedule. The D point forms in its own time, and the trader who enters early owns a position in a pattern that does not exist yet. This is the step most often violated, because a forming D point looks identical to a completed one until price keeps going.
Step three: choose the entry honestly. There are two legitimate entries, and the choice between them must happen before the trade, not during it. More on both in the next section.
Step four: place the stop beyond the void point. Every harmonic structure has a price at which the drawing is dead. For retracement patterns the drawing dies beyond X. For extension patterns it dies beyond the zone's outer band. The stop belongs past that line, because a close beyond it means the market has refuted the idea, not merely tested it.
Step five: manage the exit. The standard plan takes the first target at the 38.2 percent retracement of the A-to-D leg, the second at the 61.8 percent, and moves the stop to breakeven once the first target pays. Simple, mechanical, and decided before entry.
One honesty note belongs here, before the mechanics. Harmonic patterns come from a practitioner canon, from the pattern's original description through harmonic trading doctrine's codification, not from academic literature. The vocabulary sounds more established than the evidence base is. The method's value lives in the sequence: a located zone, a defined void, a known exit. None of that requires the pattern's lore to be true.
Where the Money Rules Sit
Steps three through five are where profit and loss actually get decided, so they deserve a slower pass.
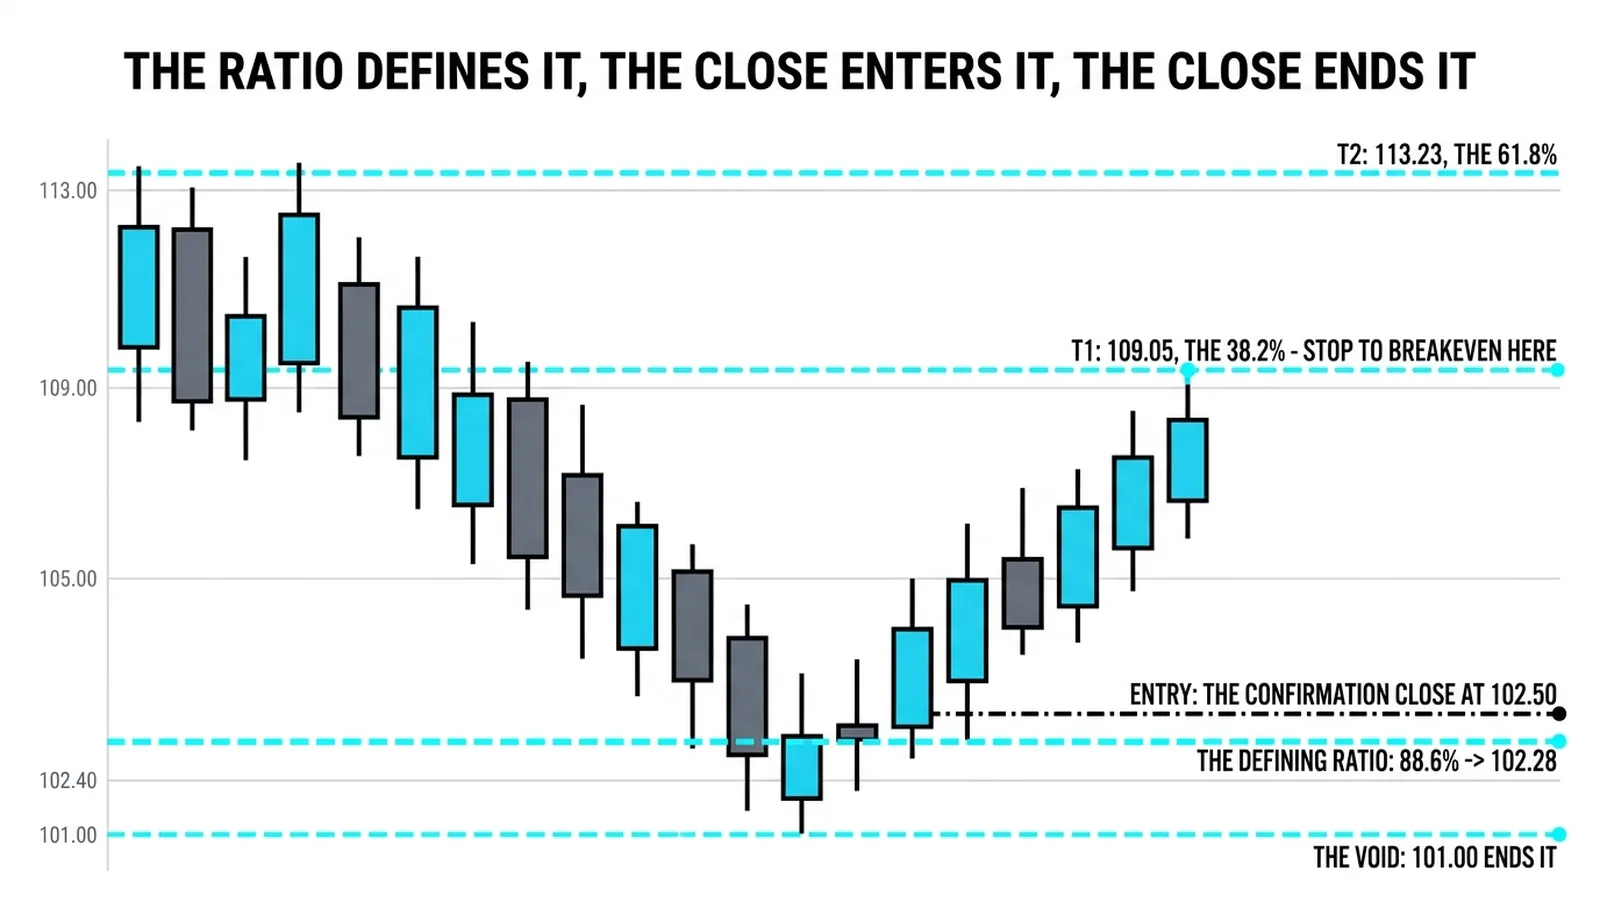
The two entry styles are the limit order and the confirmation entry. The limit order sits at the defining ratio and fills every cluster that forms there, including the failed ones. It gets the best price and the worst selection. The confirmation entry waits for a reversal candle to close inside the zone, then enters. It fills less often and better on average, because some clusters never produce the candle and those trades are quietly avoided. Both are legitimate. The dishonest version is deciding which one to use after seeing how the candle looks, because that converts a rule into a mood.
The stop deserves the same bluntness. Beyond the void point is the only defensible location. A tight variant that sits just past D costs less per loss and gets nicked more often, and many traders prefer it for that trade-off, but it answers a different question. The wide stop says: the idea is wrong only when the structure is wrong. The cluster method states the same logic in another form: the zone is where several independent measurements agree, and the market closing past that agreement has refuted it.
The exits are arithmetic. Measure the A-to-D leg. The first target sits at the 38.2 percent retracement of that leg, the second at 61.8 percent. When the first target pays, the stop moves to breakeven, and the remainder of the position runs toward the second target with the worst case already removed. The plan is fully written before the entry fills.
That is the money layer: an honest entry, a stop where the idea dies, and two targets taken in order. Everything else in harmonic trading is drawing.
The Trade at 102.50
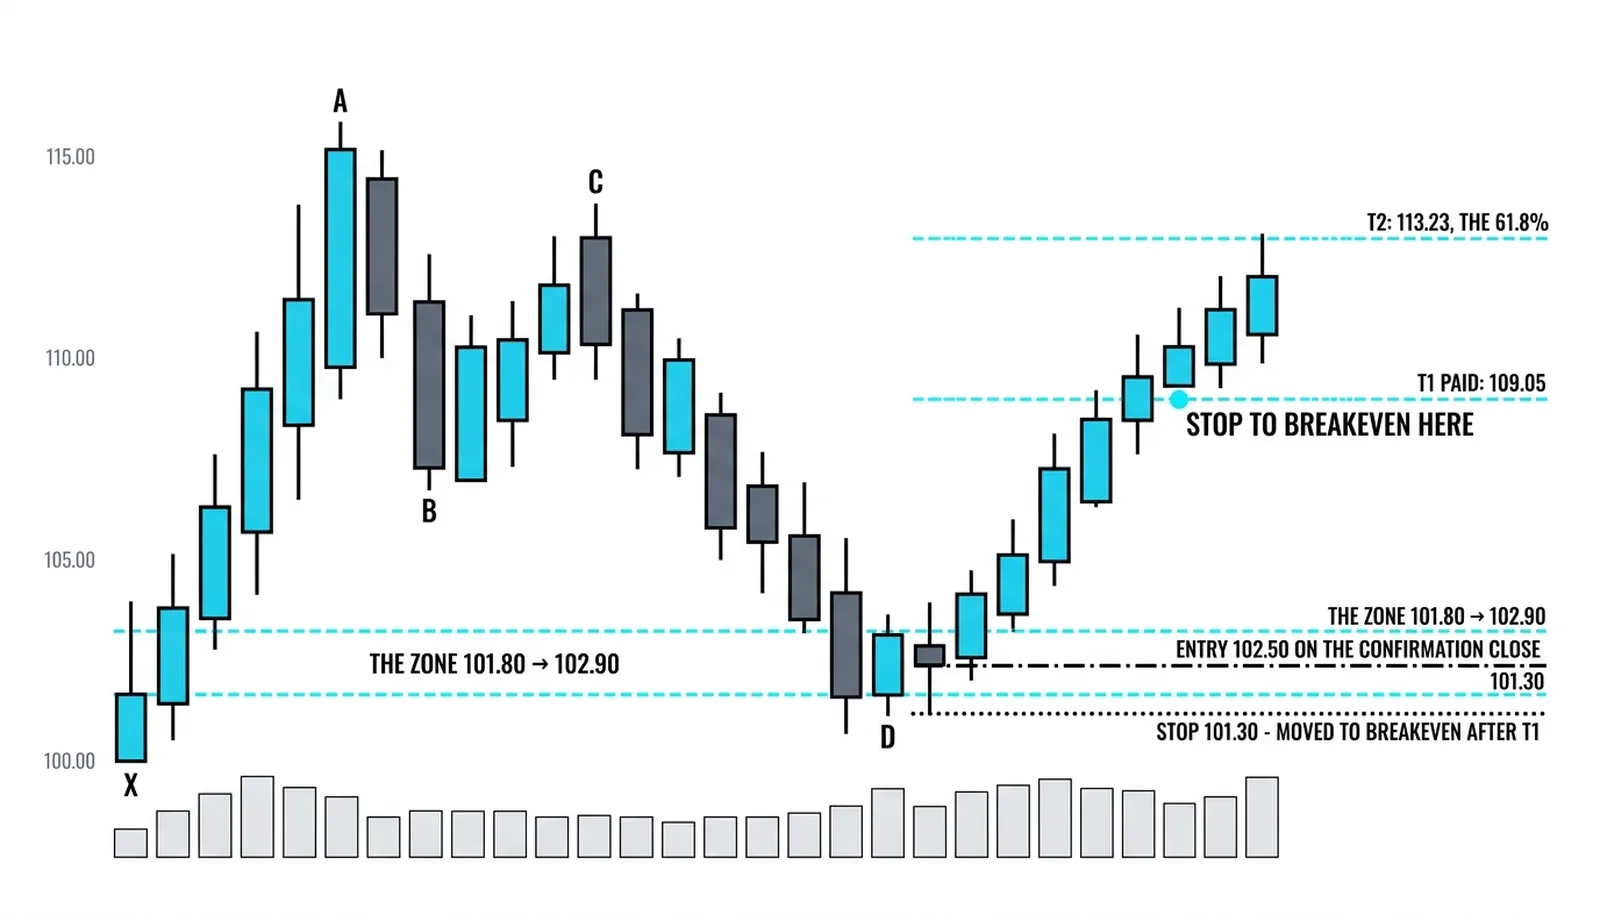
All numbers here are hypothetical and round, chosen to show the checklist in motion. The structure is the bat from the earlier lesson: X at 100.00, A at 120.00, B at 110.00, D completing at 102.28.
Step one, the gate. B at 110.00 is exactly the 50 percent retracement of the 100.00 to 120.00 leg. The bat's defining rule passes. Step two, completion. Price works down into the zone and D forms at 102.28, the 88.6 percent retracement. No entry happens while it is forming.
Step three, the entry. The confirmation style was chosen in advance: a reversal candle must close inside the zone. It closes at 102.50. The entry fills at 102.50. Step four, the stop. The drawing dies below X at 100.00, but this bat's void band sits tighter; the stop goes at 101.30, beyond the zone's lower edge. Risk is 1.20 per unit.
Step five, the exits. The A-to-D leg runs from 120.00 to 102.28, a span of 17.72. The first target at the 38.2 percent retracement is 109.05, a gain of 6.55, about 5.5 times the risk. When it pays, the stop moves to breakeven at 102.50. The second target at the 61.8 percent retracement is 113.23, a gain of 10.73, about 8.9 times the risk.
Now the failed version, because it teaches more. Same structure, same zone, but the trader enters early at 103.80 while D is still forming, unwilling to wait for the candle. Price keeps falling through 102.28, through the zone, and closes at 101.00. The position is stopped, and the checklist would never have opened it. The trader held a trade in a pattern that did not exist.
The checklist earns nothing when the zone works and everything when it fails. That asymmetry is the argument for running the steps in order.
| Step | Rule | Violation That Voids the Setup | Cost of Skipping It |
|---|---|---|---|
| Confirm the gate | B point must meet the pattern's defining ratio | B outside tolerance, e.g. bat B past 61.8 | Trading a shape with no identity |
| Wait for completion | D must finish inside the zone | Entry while D is still forming | A position in a pattern that does not exist |
| Choose the entry | Limit or confirmation, decided in advance | Switching styles after seeing the candle | Worst fills of both methods |
| Place the stop | Beyond X or the zone's outer band | Stop inside the zone | Nicked out of valid setups |
| Manage the exit | 38.2 and 61.8, breakeven after the first | Improvised targets | Winners cut short, losers left open |
Harmonic Questions, Answered
How do you trade harmonic patterns?
By running a five-step checklist in order: confirm the pattern's defining B-point gate, wait for the D point to complete inside the zone, enter by a rule chosen in advance, place the stop beyond the void point, and exit at the 38.2 and 61.8 percent retracements of the A-to-D leg with the stop moved to breakeven after the first target. The drawing finds the location; the checklist makes it a trade.
Where does the stop loss go?
Beyond the point where the drawing is dead. For retracement patterns that means past X; for extension patterns, past the zone's outer band. A tighter stop just beyond D is a legitimate variant, cheaper per loss and nicked more often, but a stop inside the zone is a mistake either way, because ordinary noise lives there.
What are the targets for harmonic patterns?
The standard plan takes the first target at the 38.2 percent retracement of the A-to-D leg and the second at 61.8 percent. When the first pays, the stop moves to breakeven and the remainder runs. Some traders extend a final portion toward A itself, but that is an addition to the plan, not a replacement for it.
Do harmonic patterns work?
The honest answer is that the ratios come from practitioner tradition rather than academic validation, and the evidence base is thinner than the vocabulary suggests. What demonstrably works is the structure the method imposes: a located entry zone, a defined void point, known targets, and a sequence that refuses early entries. Traders who profit with harmonics usually profit from that discipline, and the same discipline would improve most other methods too.
Run the sequence on the next twenty zones you find, on paper first, and log which step you were tempted to skip. The next lesson in the harmonic set takes the same checklist into the deeper extension structures, where the zones get wider and the discipline matters more.