Fibonacci Confluence with Price Action
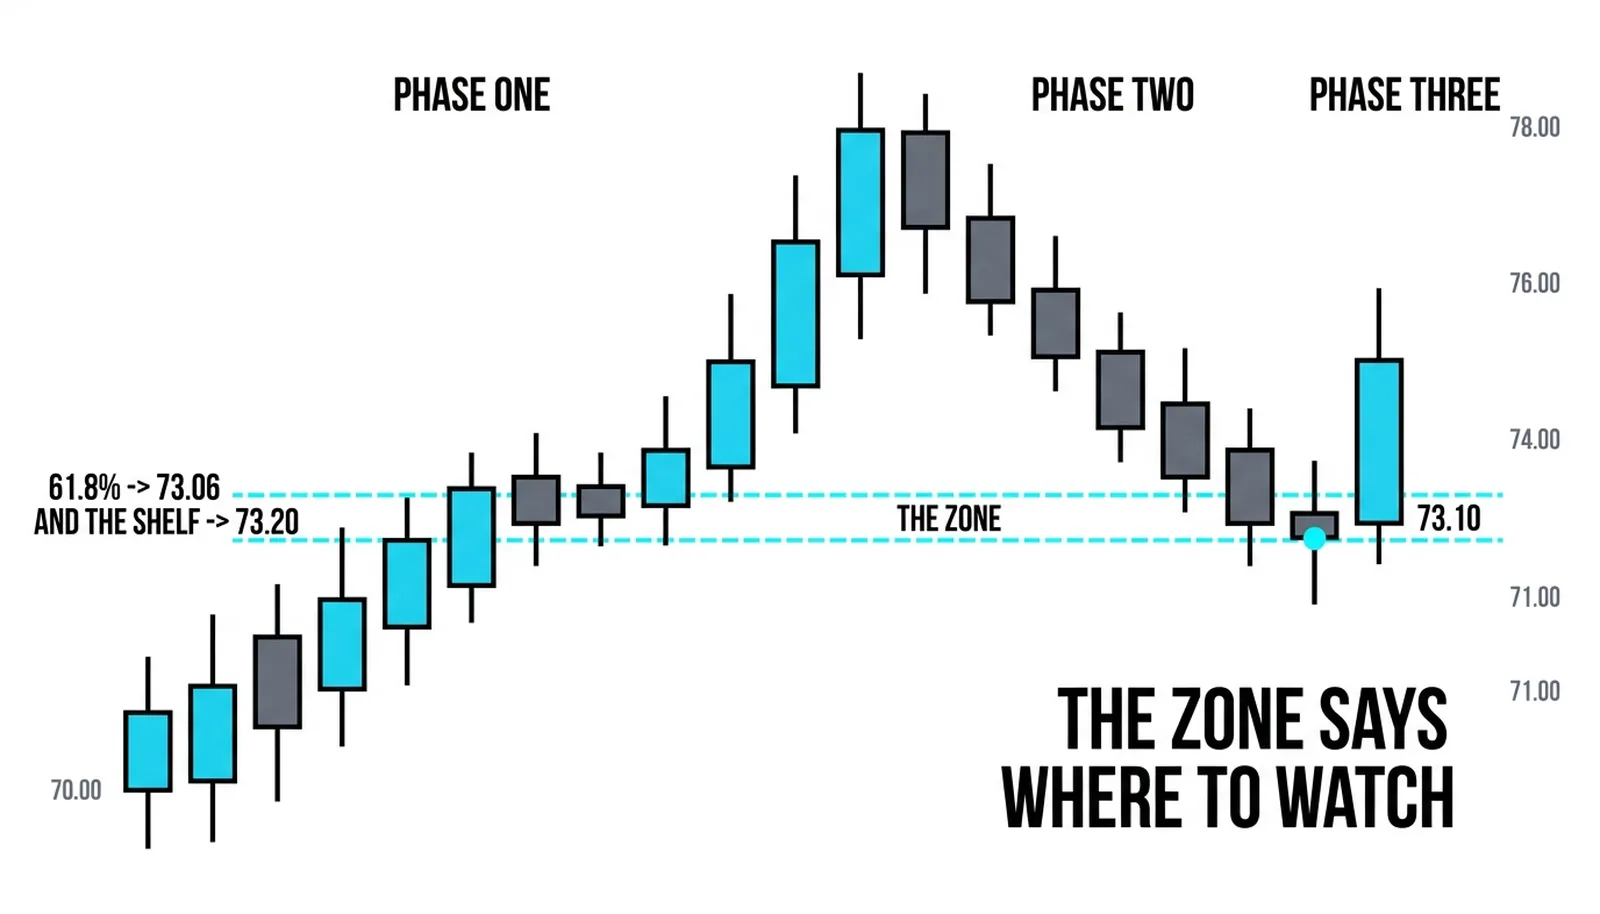
Fibonacci confluence with price action is the final pairing in this course: the location a stacked zone provides meeting the signal a candlestick provides, because the zone says where to watch and only the reaction says when to act. Every lesson before this one built half of the trade. The retracement lines and the shelf built the where. The reactions lessons built the when. This lesson joins them, and the join is the method.

Think of the zone as a contract already drafted, the terms negotiated in advance and made binding by one signature at the bottom. The measurement work drafts the document. The candlestick signs it. A drafted contract with no signature binds nobody, and a signature on a blank page binds nobody either. The trade exists only when both are present on the same chart, in the same few bars.
Location First, Signal Second
The trendline lesson joined the fixed and the moving. This lesson adds the last piece: the candlestick signal fired inside the prepared zone. The order of authority matters and does not change. Location first, signal second, entry third.
The division of labor is clean. The zone, built from the retracement line and the shelf, is the contract's terms. It states where the crowd is likely to be, where the risk belongs, and where the idea would be proven wrong. The signal is the signature: an engulfing candle closing inside or above the zone, a long wick stabbing into it and closing back out, the same reactions the reactions lesson classified, now given a place to happen.
The price action canon states the rule for this pairing directly: the signal without the location is a pattern in the abstract, right often enough to be dangerous, and the location without the signal is a place to watch with no reason to act. The trade exists when both arrive together. The cluster method supplies the location first and then waits for the market's answer at it, the measurement proposing and the candle disposing.
Here is the honesty that keeps this pairing alive. A signal inside a weak zone is a strong trigger for a bad trade. A strong zone with no signal is patience doing its job, not an opportunity missed. Most losing trades in this family come from reversing the order, seeing a pretty candle first and then hunting for a zone to justify it.
The Signals That Qualify
Not every candle inside a zone counts. The reactions lesson sorted the meaningful responses from the noise, and the same sorting applies here, tightened by the fact that a measured level sits underneath.
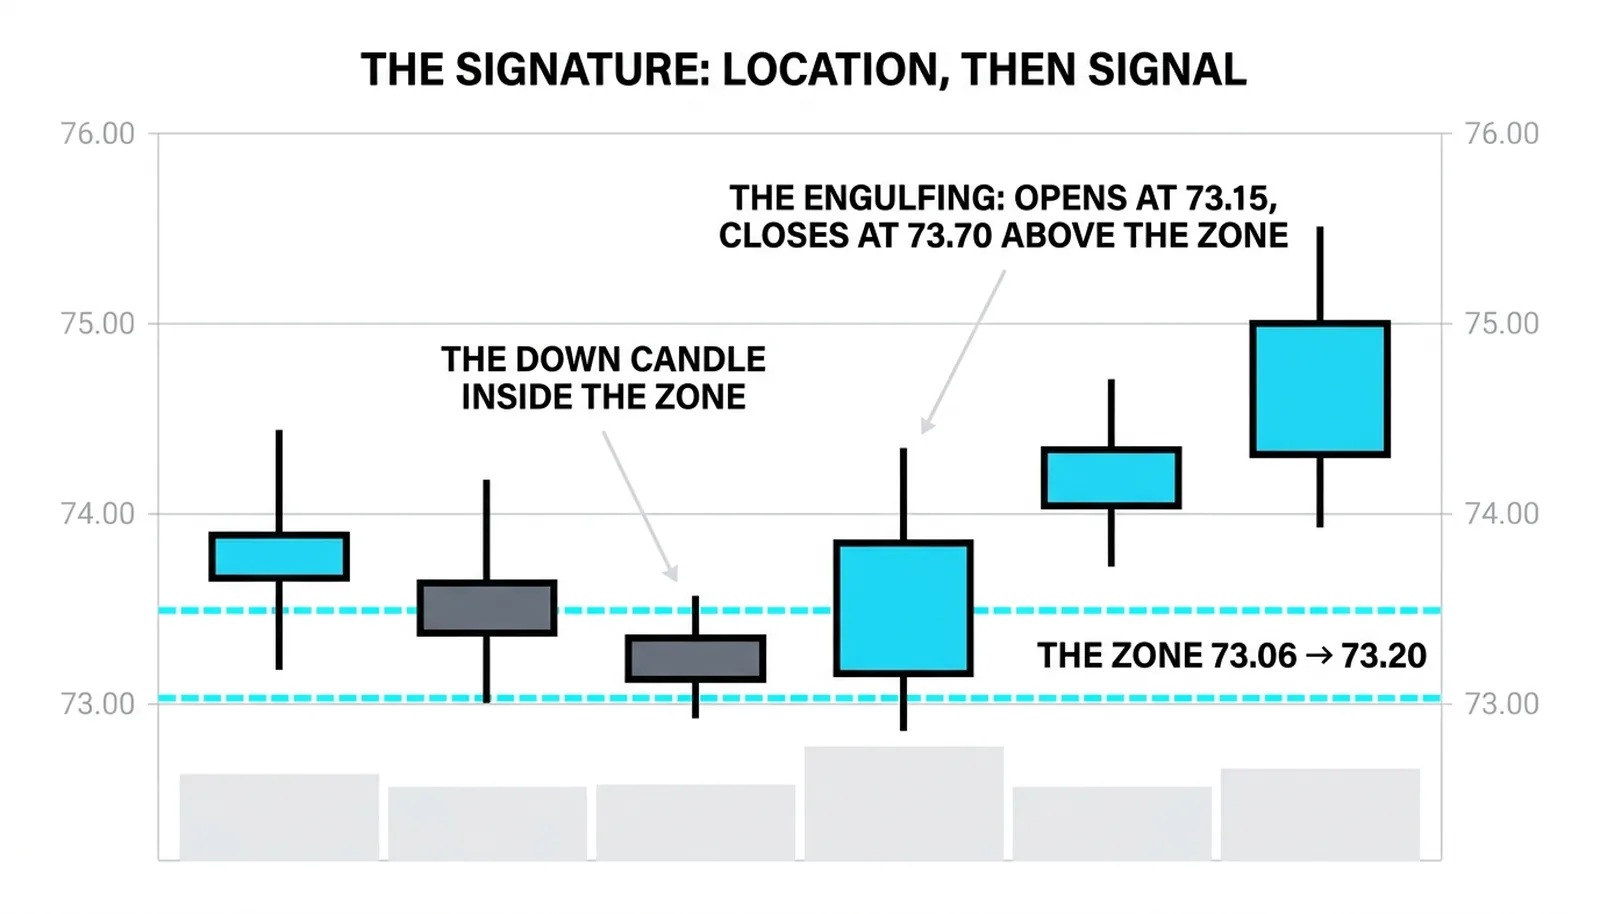
- The engulfing close. A candle whose body fully covers the prior candle's body, closing inside or above the zone. This is the strongest signature because it shows the rejection and the follow-through in one bar. The close matters more than the shape. An engulfing candle that closes back below the zone's lower edge is a warning, not a trigger.
- The rejection wick. A long lower wick probing into the zone, with the body closing back above it. The market tested the level and was refused. The wick shows where sellers tried; the close shows where they failed. The longer the wick relative to the body, the clearer the answer.
- The hesitation that resolves. A small-bodied candle or two stalling at the zone, followed by a decisive candle closing away from it in the trend's direction. The stall alone is not a signal. The resolving candle is.
- What does not qualify. A candle drifting through the zone without pausing. A close below the zone on the pullback candle. A gap through the level with no test at all. Each of these is the market declining to sign, and the correct response is to do nothing.
One blunt rule covers most cases. The close is the answer; the wick is the question. Traders who act on the wick before the close are signing the contract before reading the final terms, and the final terms sometimes change in the last minutes of the bar.
Trading the Signed Contract
The entry comes on the signal's close, not before it. When the engulfing candle closes inside or above the zone, the contract is signed and the trade can be taken at the next bar's open or on a small limit order just past the close. Entering early, while the candle is still forming, converts a confirmed signal into a guess.
The stop belongs below both the zone and the pattern's low. Two things must fail for the trade to be wrong: the stacked level and the signal itself. Placing the stop where only one has failed invites a normal wiggle to exit a sound trade. Placing it beyond both accepts the full risk the idea carries, sized so the position survives the loss without damage.
The target sits in front of the old extreme, not at it. Price often stalls just short of a prior high as early sellers act, so taking profit a small distance before the level keeps the exit realistic. The reward-to-risk arithmetic should be done before entry, and if the numbers do not offer at least two to one, the correct trade is no trade.
Now the failed version, because it will happen. The engulfing prints, the entry fills, and the next candle closes below the zone. The signature was forged. The trade dies at the stop, the loss is the planned amount, and nothing about the method changes. The pairing never promised every contract binds. It promised that every trade taken was negotiated in advance, with the location defining the risk and the signal timing the entry. A method that loses small on forged signatures and collects multiples of risk on genuine ones does not need a high win rate to work.
The Engulfing at 73.10
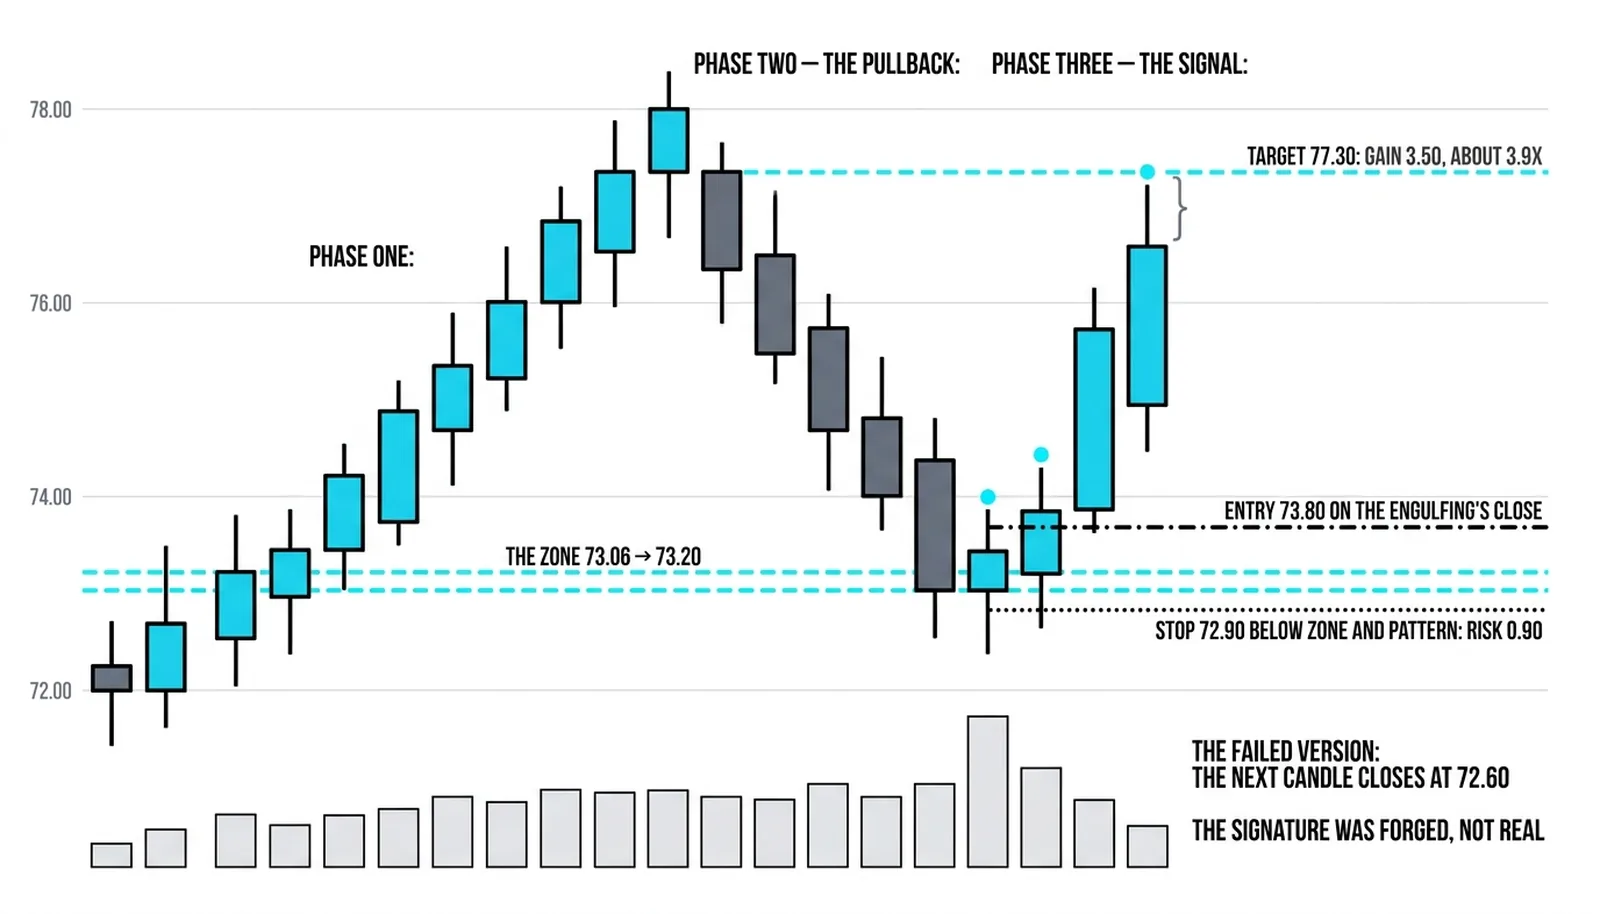
All numbers here are hypothetical and invented for illustration. A leg runs 8.00 points, from 70.00 up to 78.00. The 61.8 percent retracement line sits at 73.06, and an old consolidation shelf sits at 73.20. The zone spans 73.06 to 73.20, fourteen cents of stacked evidence.
Price pulls back to 73.10, inside the zone, and prints a bullish engulfing candle that closes at 73.70. Location and signal have arrived together. The long is taken at 73.80 on the engulfing's close. The stop goes at 72.90, below the zone's lower edge and below the pattern's low. The risk is 0.90 per share.
The first target is 77.30, just under the old high at 78.00. From the 73.80 entry, that is a gain of 3.50 against a risk of 0.90, roughly 3.9 times the risk. One trade of this shape pays for nearly four failed versions of itself.
The failed version looks like this. The same engulfing prints and the same entry fills at 73.80. The next candle closes at 72.60, below the zone and below the stop. The position exits at 72.90 for the planned 0.90 loss. The zone was real, the signal was real, and the trade still lost, because signatures get forged. The method's edge is in the ratio, not in any single outcome.
| Component | Its Own Evidence | Its Own Job | Risk If Used Alone |
|---|---|---|---|
| Retracement line | The 61.8 percent level at 73.06, measured from the leg | Proposes where the pullback should end | Any single line is a guess at one price |
| Consolidation shelf | Old trading activity at 73.20 | Confirms real transactions happened there | A shelf alone ignores the current leg's math |
| The stacked zone | Both levels agreeing across 73.06 to 73.20 | Defines risk, location, and failure in advance | A place to watch with no reason to act |
| The candlestick signal | Engulfing close at 73.70 inside the zone | Times the entry and confirms the reaction | A pattern in the abstract, right often enough to be dangerous |
Price Action Questions, Answered
What is confluence with price action?
Confluence with price action is the meeting of a stacked Fibonacci zone and a candlestick signal at the same price, where the zone supplies the location and the signal supplies the timing. Neither half is a trade by itself. The zone says where to watch, the reaction says when to act, and the entry belongs to the bar where both are present.
Should you enter at the zone or wait for the signal?
Wait for the signal. Entering at the zone in advance is buying a level because it exists, and levels fail often enough to make that habit expensive. The candlestick reaction is the market's answer at the prepared location, and acting before the answer arrives converts a defined-risk trade into a hope with a stop attached.
Which candlestick patterns work best at confluence?
The engulfing candle closing inside or above the zone is the strongest, followed by the long rejection wick that probes the level and closes back out. Both show the test and the refusal in a readable form. Small indecision candles qualify only when a decisive candle resolves them in the trend's direction, and a close through the zone disqualifies the setup entirely.
What if the signal fails inside the zone?
The trade exits at the stop for the planned loss, and nothing about the method changes. A failed signal means the signature was forged, which happens on a meaningful share of setups. The pairing's edge comes from risking a small, pre-defined amount on failures while collecting several times that amount on the trades where the zone and the signal both hold.
One component remains outside this lesson: the structure underneath, the order blocks and imbalances the structure lessons drew, and the higher-timeframe levels that grade every zone on this chart. The next lessons join them.