The Outside Bar and the Engulfing Bar
The engulfing bar and the outside bar both mark a fight that one side won completely. An outside bar is a bar whose high exceeds the prior bar's high and whose low drops below the prior bar's low. The engulfing version is the candlestick reading of the same event: the second bar's body swallows the first bar's body. One side reached in both directions, and the other side closed the period in full control. That is the signal.

Think of a snake taking an egg: the second period opens its range around the first period's entire trade and swallows it whole. An earlier level named these shapes in its pattern catalog, so this lesson does the two jobs the catalog could not. It separates the two definitions precisely, because traders mix them constantly, and it shows how to trade them. Order flow analysis treats these bars as evidence of a completed transfer of control, and that framing is the right one.
Two Definitions, Kept Straight
The outside bar is a range test. The bar must print a higher high and a lower low than the bar before it. Where the body lands does not matter for the definition. The bar proved it could reach beyond the prior bar in both directions.
The engulfing bar is a body test. The second candle's real body must cover the first candle's real body. It is bullish when a green body swallows a red body down at a low, and bearish when a red body swallows a green body up at a high. The wicks are secondary here. What counts is that the closing auction reversed the prior bar's open-to-close direction entirely.
A bar can be both at once, and those are the strongest versions. A bar can also be one and not the other, and the difference matters:
- Outside bar, body not engulfing: both sides reached, but the close did not settle the argument. Treat direction as unresolved until the close confirms.
- Engulfing body, range not outside: the body reversed the prior bar, but no new extreme was made. Weaker, because no stops were run.
- Both: the second bar reached past the prior bar in both directions and closed in full command. This is the textbook signal.
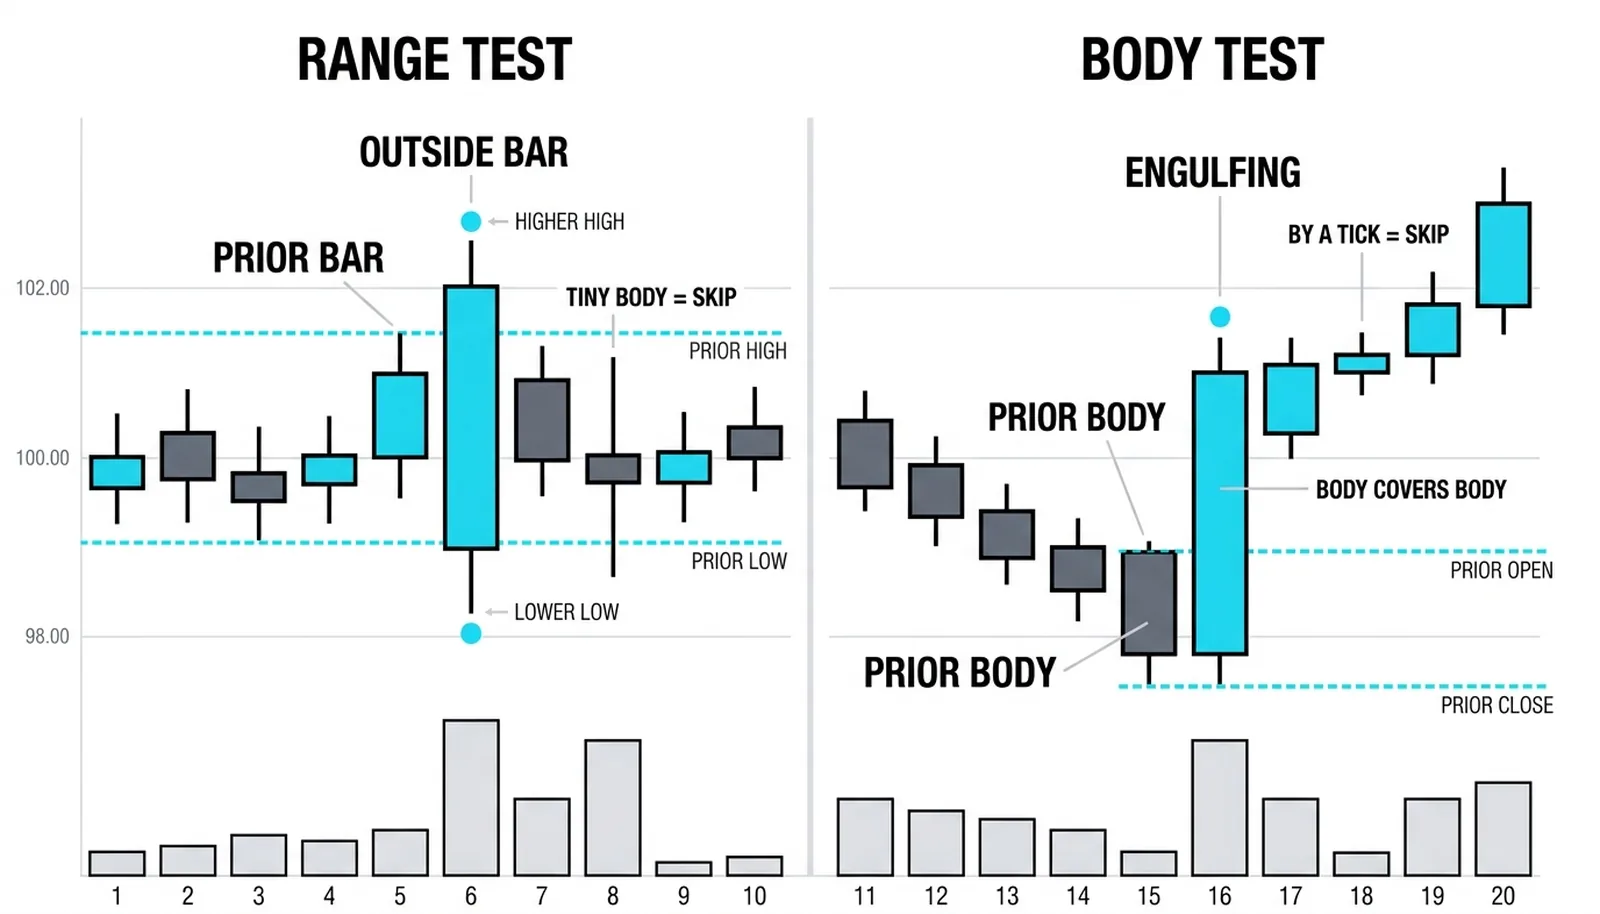
Now the warning that saves accounts. An outside bar with a tiny body is not conquest. It is indecision. Both sides pushed beyond the prior range and neither could hold anything. That bar is a cousin of the doji family, not a reversal signal, and trading it as a reversal is one of the most common ways new traders donate money.
Size discipline applies to the engulfing side too. If the second body covers the first body by a hair, the pattern is technically present and practically meaningless. The swallow must be obvious at a glance. If you have to measure it, skip it.
| Feature | Outside bar | Engulfing bar | The read |
|---|---|---|---|
| Range test | High above and low below the prior bar | Not required; wicks are secondary | Both directions were explored in one bar |
| Body test | Not required; the body can be small | The second body covers the first body | The close reversed the open-to-close fight entirely |
| Tiny-body version | Both sides reached, neither won | A swallow by a tick is a stutter | Skip it; the margin must be obvious at a glance |
| Strongest version | Outside range AND engulfing body together | The textbook signal, still gated by the level | |
Where They Form and Why
These bars bunch up at levels. They do not distribute randomly across the chart, and the reason is mechanical. An outside bar usually forms where stops clustered. A cluster of sell stops below a swing low, or buy stops above a swing high, is a pool of resting orders. When price runs through that pool, the triggered stops become market orders, and that surge of forced business provides the liquidity for the reversal.
The psychology runs in two acts. In the first act, the bar breaks the level and the breakout crowd enters while the faders get squeezed. In the second act, price fails to hold the break, reverses, and closes back through the prior bar's body. Now the breakout traders are trapped on the wrong side, and the faders who covered are chasing. Their exits feed the second move. The trapped crowd flips at the close, and the close is what makes the bar readable.
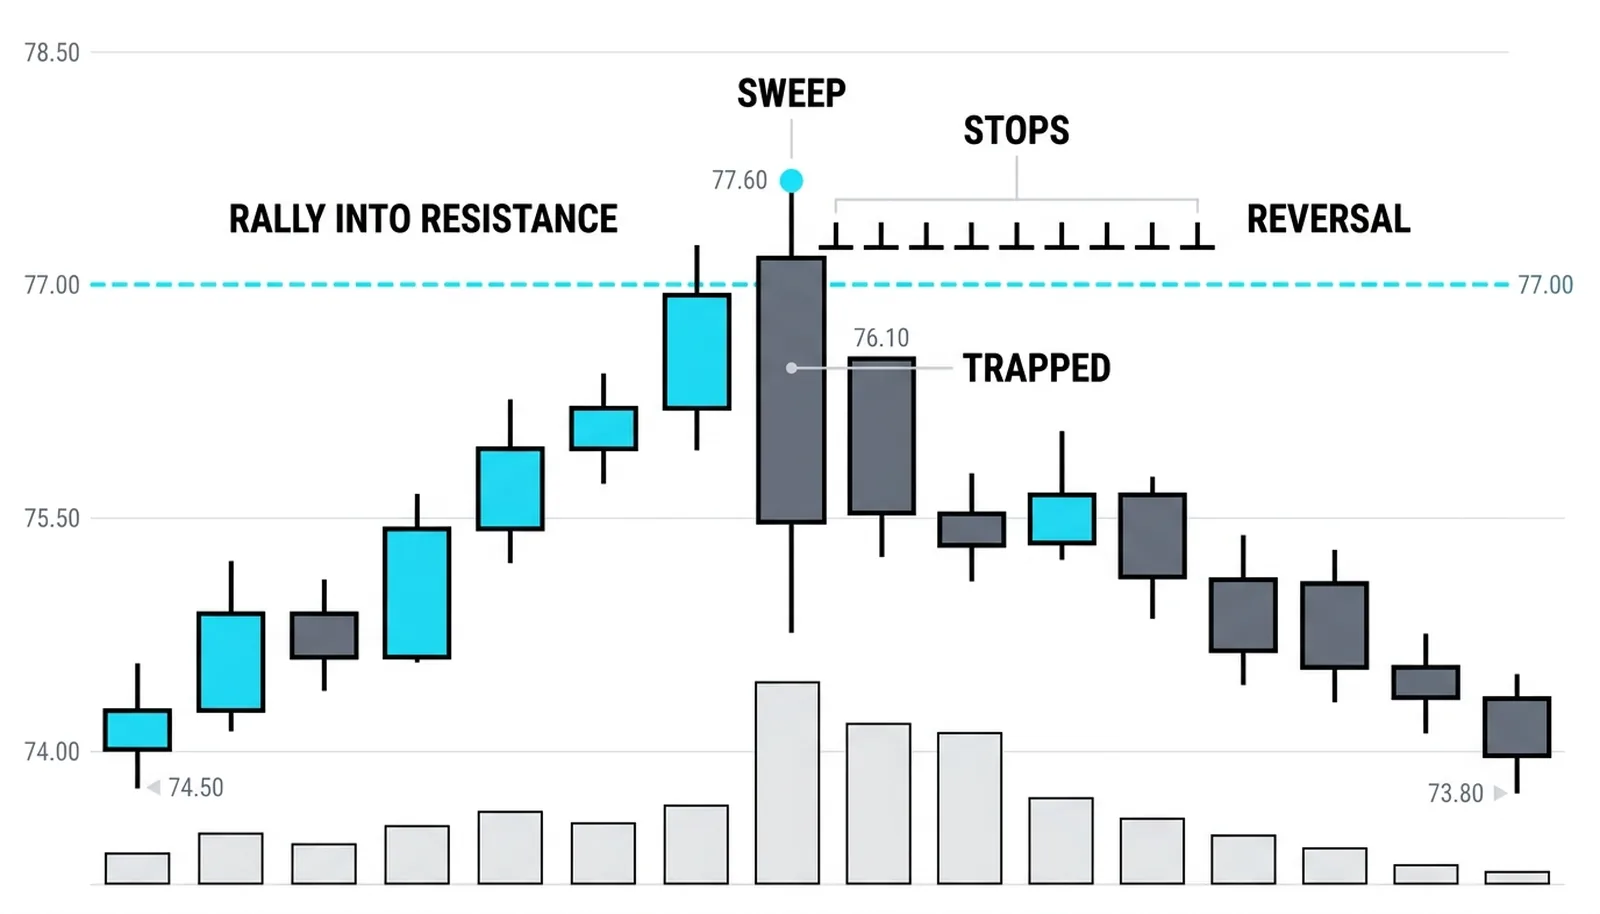
This is why context is the gate. A bearish engulfing bar printed at a marked resistance level after a sustained rally is a signal. The same shape printed mid-range in a quiet afternoon session is noise in a quiet room. Before you trade any swallow, ask three questions:
- Is the bar sitting at a level that already mattered, a prior swing, a trendline, a session high or low?
- Did price travel to get here, so there is a crowd positioned to be wrong?
- Is the bar large relative to recent bars, so the rejection is visible without a ruler?
If the answer to any of those is no, the bar is shape without story. Pass.
Trading the Winner
The standard entry is the break of the outside bar's extreme in the direction of the rejection. For a bearish swallow, you short the break of the outside bar's low. For a bullish swallow, you buy the break of its high. This keeps you out until the market confirms the second bar's close was not a bluff.
The stop belongs beyond the opposite extreme of the outside bar. If the swallow is bearish, the stop sits above the outside bar's high. The logic is clean: if price takes out that high, the rejection failed and the trade idea is dead. Do not tighten the stop inside the pattern to improve the reward-to-risk on paper. A stop inside the pattern is a stop inside the fight.
Targets come from structure, not hope. The first reasonable target is the nearest swing point in the trade direction. If that swing sits closer than roughly one and a half times your risk, the trade is thin and worth skipping. Two practical rules round out the plan:
- The failed-swallow exit: if the next bar or two pushes back through the outside bar's extreme against you, the rejection is void. Exit without waiting for the stop. The market just told you the swallow did not hold.
- The one-bar rule: the signal is freshest on the bar immediately after the outside bar. If price drifts sideways for several bars without triggering, the trapped crowd has already escaped and the edge decays.
Blunt truth: most outside bars you see on a chart are not trades. The pattern is common. The pattern at a level, after a run, with clear size, is rare. Your edge lives in the filtering, not the recognition.
The Swallow at 45.60
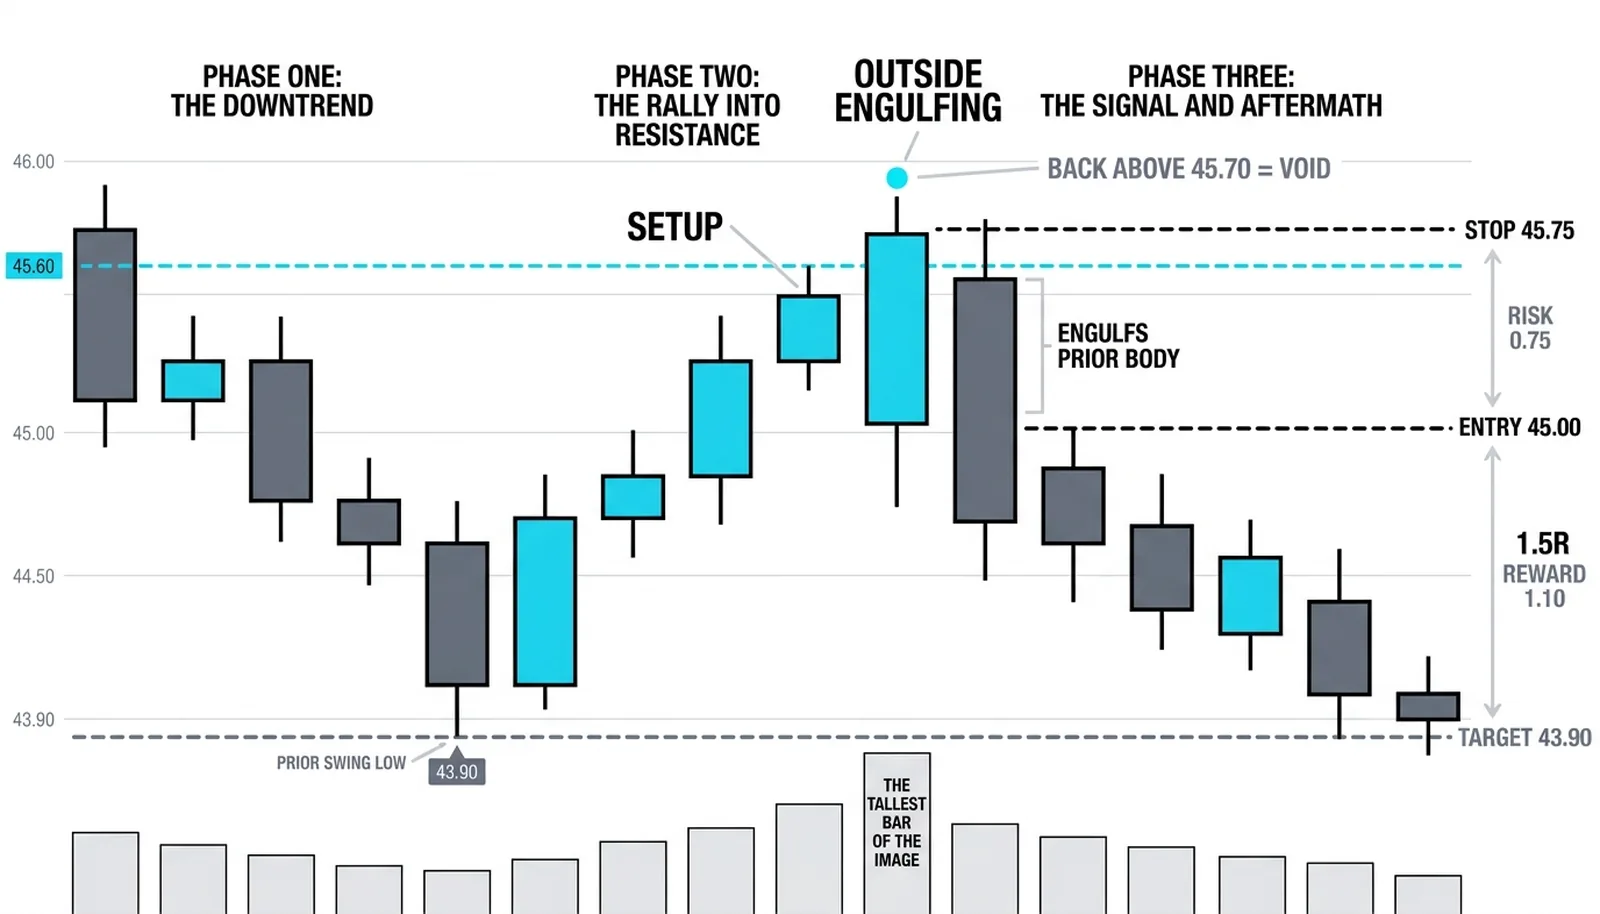
A worked example, with invented round numbers, purely hypothetical. A market in a downtrend rallies back into a marked resistance level at 45.60.
The bar before the signal is small and hopeful: it opens at 45.40, pushes to a high of 45.60, dips to a low of 45.35, and closes at 45.55. Buyers are testing the level. Nothing is decided.
The signal bar opens at 45.58, pushes up to 45.70, then sells off hard to 45.05 and closes at 45.15. Read it against both definitions. The high of 45.70 exceeds the prior high of 45.60, and the low of 45.05 undercuts the prior low of 45.35, so it is an outside bar. The body from 45.58 down to 45.15 covers the prior body from 45.40 to 45.55 entirely, so it is also a bearish engulfing bar. Both tests passed, at a level, after a rally into resistance.
The conservative plan shorts the break of 45.00, just below the outside bar's low. The stop sits at 45.75, just above the outside bar's high, so the risk is 0.75 per unit. The target is the prior swing low at 43.90, which pays about 1.10, roughly 1.5 times the risk. Acceptable, though not generous.
Now the failure branch. Suppose instead the next bar pushes back up through 45.70. The rejection is void. Anyone short on the break exits immediately rather than waiting for 45.75, because the market has already answered the question the trade was asking. The failed swallow is itself information: a level that could not produce a held rejection often gives way on the next attempt.
Engulfing Bar Questions, Answered
What is the difference between an outside bar and an engulfing bar?
The outside bar is a range test and the engulfing bar is a body test. An outside bar needs a higher high and a lower low than the prior bar, regardless of where it closes. An engulfing bar needs the second candle's real body to cover the first candle's real body. The strongest signals satisfy both at once.
Does an engulfing bar need to be at a level?
Yes, for practical purposes. The pattern works because stops cluster at levels and the trapped crowd fuels the reversal. Mid-range in quiet trade, there is no crowd to trap and no fuel to burn, so the same shape carries no edge.
How big does an engulfing bar need to be?
Big enough to be obvious without measuring. The second body should cover the first body by a clear margin, and the bar should stand out against recent bars. A swallow by a tick or two is a stutter, not a statement.
Can you trade an engulfing bar as a beginner?
Yes, if you trade it by the rules rather than by the shape. Wait for the close, demand a level, enter on the break of the extreme, place the stop beyond the opposite extreme, and take the failed-swallow exit without negotiation. Beginners get hurt when they trade every engulfing shape they spot instead of the few that pass the filter.
Next in this level, the fakey takes the same idea one step further: the false break of an inside bar, where the trap springs on the breakout traders themselves and the reversal comes from their exits alone.