Doji Candles: What Indecision Really Means
A doji is a bar whose open and close land at nearly the same price, a draw, and in trading a draw after a fight is information. The indecision it shows means the side that was winning stumbled, the other side pushed back, and neither could finish. Whatever story the candles were telling before it, the doji interrupts that story with silence.

Think of it as a shrug in a tense conversation: no answer given, but the timing of the shrug says plenty. An earlier level introduced the doji family by name, the plain doji, the dragonfly, the gravestone, the long-legged versions, cataloged in the single-candle lesson, so this one skips the taxonomy and goes straight to the psychology. The question is never "what shape is this." The question is who got embarrassed while this bar was printing, and whether the next bar confirms the embarrassment or erases it.
Four Draws, Four Confessions
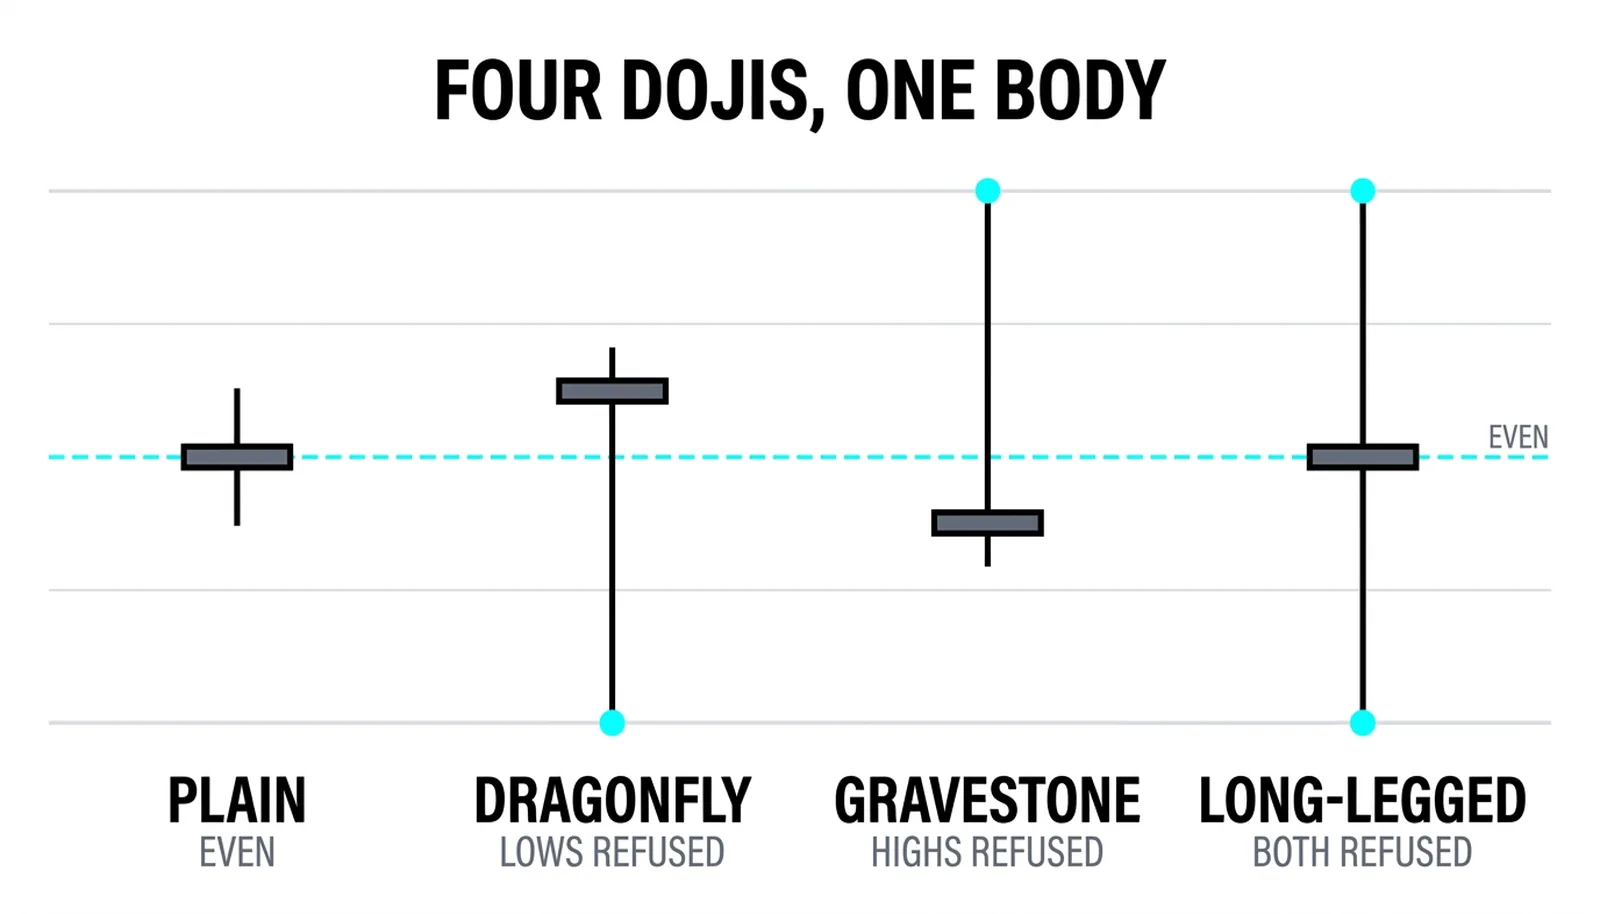
All dojis share the same body, almost none at all. What separates them is the wicks, and the wicks are the confession. Each variation tells you which side reached, which side refused, and how violent the argument was before it ended in a draw.
The plain doji. Small wicks on both sides, open and close essentially identical. This is a truly even session. Buyers pushed a little, sellers pushed a little, and the price came home. It is the mildest form of indecision, and by itself it says the least. It matters only when the bars around it were loud.
The dragonfly. A long lower wick and almost no upper wick, with the open and close parked at the top. Sellers drove the price down hard during the session, and buyers reclaimed every bit of it by the close. That is a refusal of the lows. Someone tried to break the price and failed in public. When a dragonfly prints at support after a decline, it is one of the more constructive shapes a single bar can make, because the sellers showed their hand and lost it.
The gravestone. The mirror image. A long upper wick, open and close at the bottom. Buyers reached up during the session and were abandoned there. That is a refusal of the highs. After a rally into resistance, a gravestone says the advance found sellers waiting, and the buyers who chased the top of that wick are now underwater and looking for the exit.
The long-legged doji. Both wicks extended, body in the middle. This was a violent two-sided fight that ended exactly even. Sellers broke the price down, buyers broke it up, and neither could hold anything. It is often the loudest indecision on the chart, a session where both camps committed real size and both walked away with nothing. After a strong trend, a long-legged doji frequently marks the moment the trend's conviction cracked.
Notice the pattern across all four. The wick shows where someone tried to go. The close shows whether they were allowed to stay, the map the previous lesson drew bar by bar. A draw with a long wick is a failed attempt, and failed attempts are what make traders exit, reverse, and fuel the next move.
Tension Makes the Draw Matter
A draw only matters after tension. That is the placement rule that runs the whole family, and ignoring it turns a useful warning into noise.
A doji after a five-bar rally means the winning side just stumbled in front of the whole market. The buyers were in control, everyone could see it, and then a session arrived where they could not push the close above the open. That stumble invites profit-taking from the longs and curiosity from the shorts. The same logic applies at levels: a doji printed right at a tested resistance shelf, or at a well-watched support floor, is a draw happening at the exact address where a decision was due, the location lesson in its purest form. The location was a question, and the market answered with a shrug.
Now the other case. A doji in the middle of a quiet, overlapping range is just a quiet bar. Nothing was being contested, nobody was winning, and the draw settles an argument nobody was having. Open-equals-close happens constantly in dead markets, in lunch hours, in thin holiday sessions, in sideways chop. A shrug from someone who was never asked a question carries no information at all.
So grade the context before the candle. Ask two things. Was there a move or a level that created tension? And does this draw interrupt that tension? If both answers are yes, the doji deserves attention. If either is no, treat it as background noise and move on.
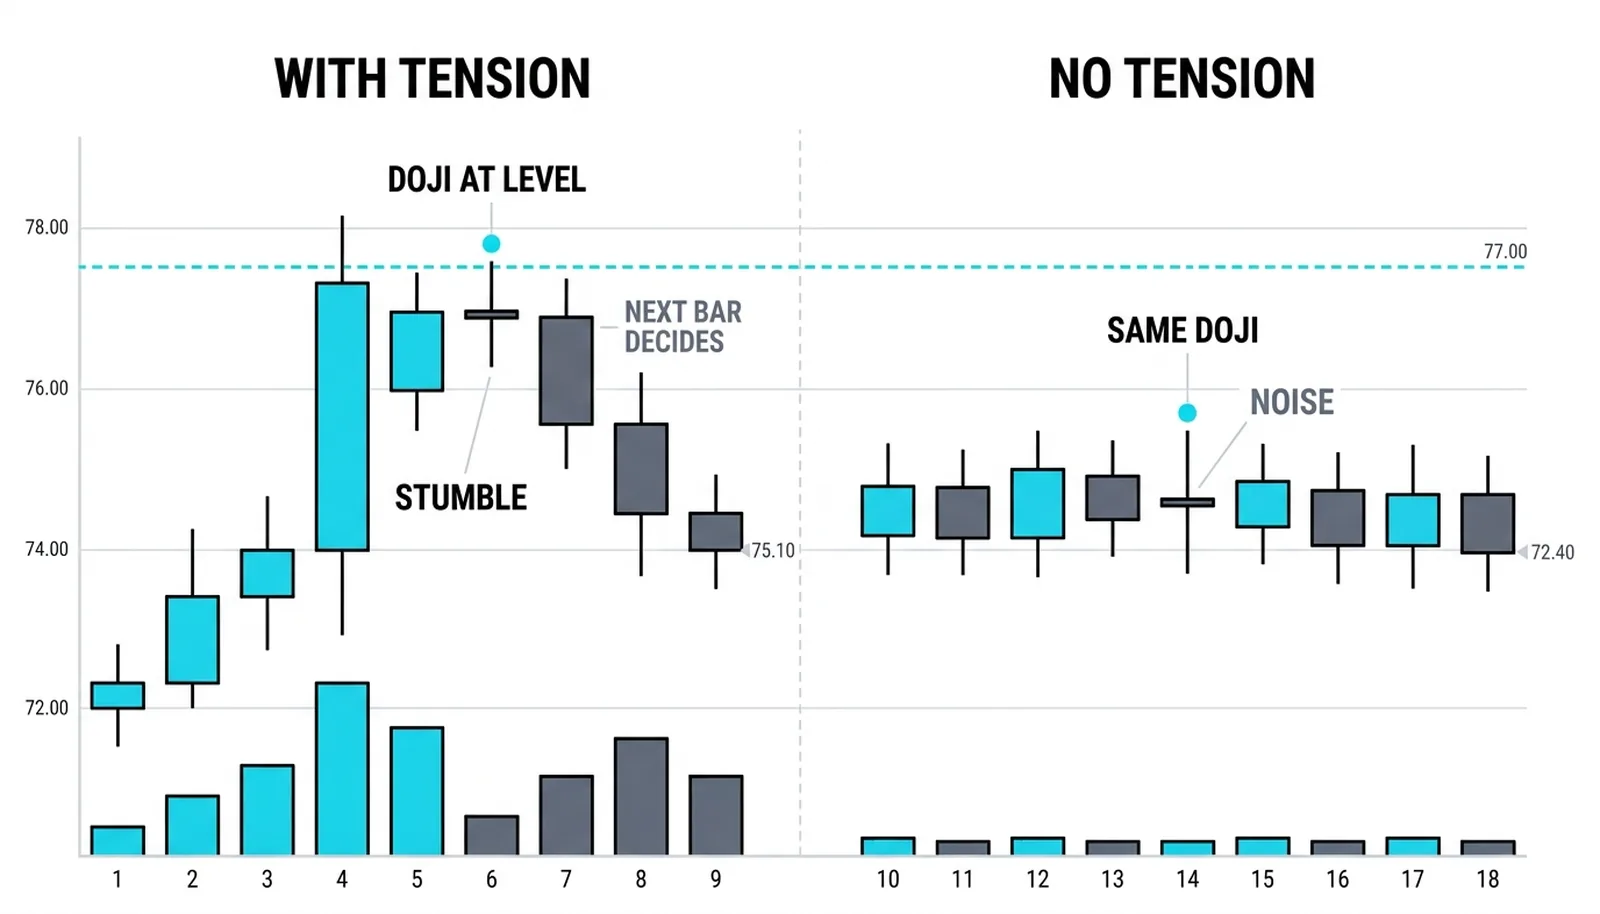
Be honest about the limits here. The pattern-testing literature is consistent on this point: these shapes, taken as standalone signals, are weak. The doji is the warning that a move is tired. The next bar is the signal that decides whether the warning was real.
Trade the Confirmation, Not the Shrug
Never trade the doji alone. Half of all stumbles are recovered by the very next session, which means a trader who shorts every gravestone or buys every dragonfly is taking a guess and paying spread.
The entry belongs to the confirmation bar, the bar that closes beyond the doji's extreme in the direction the context suggests. After a rally, you want a bar that closes below the doji's low; that close proves the stumble became a fall. After a decline, you want a close above the doji's high. Until that bar prints, you have a warning and nothing else.
The stop placement falls out naturally. For a short, the stop sits above the doji's high, because a trade back above the high means the refusal failed and the buyers regained control. For a long, the stop sits below the doji's low. The doji's own range defines the risk, a rare courtesy from this pattern.
Targets come from structure, not from the candle. Measure back to the origin of the move that preceded the doji, or to the nearest opposing level. If the distance to that target is smaller than the risk to the stop, skip the trade. A beautiful draw with a poor reward-to-risk is still a poor trade.
The discipline cuts both ways. When confirmation never comes, when the next bar closes back through the doji in the original trend's direction, there is no trade and there never was. The stumble was recovered, the warning expired, and the correct position was flat.
The Draw at 103.20
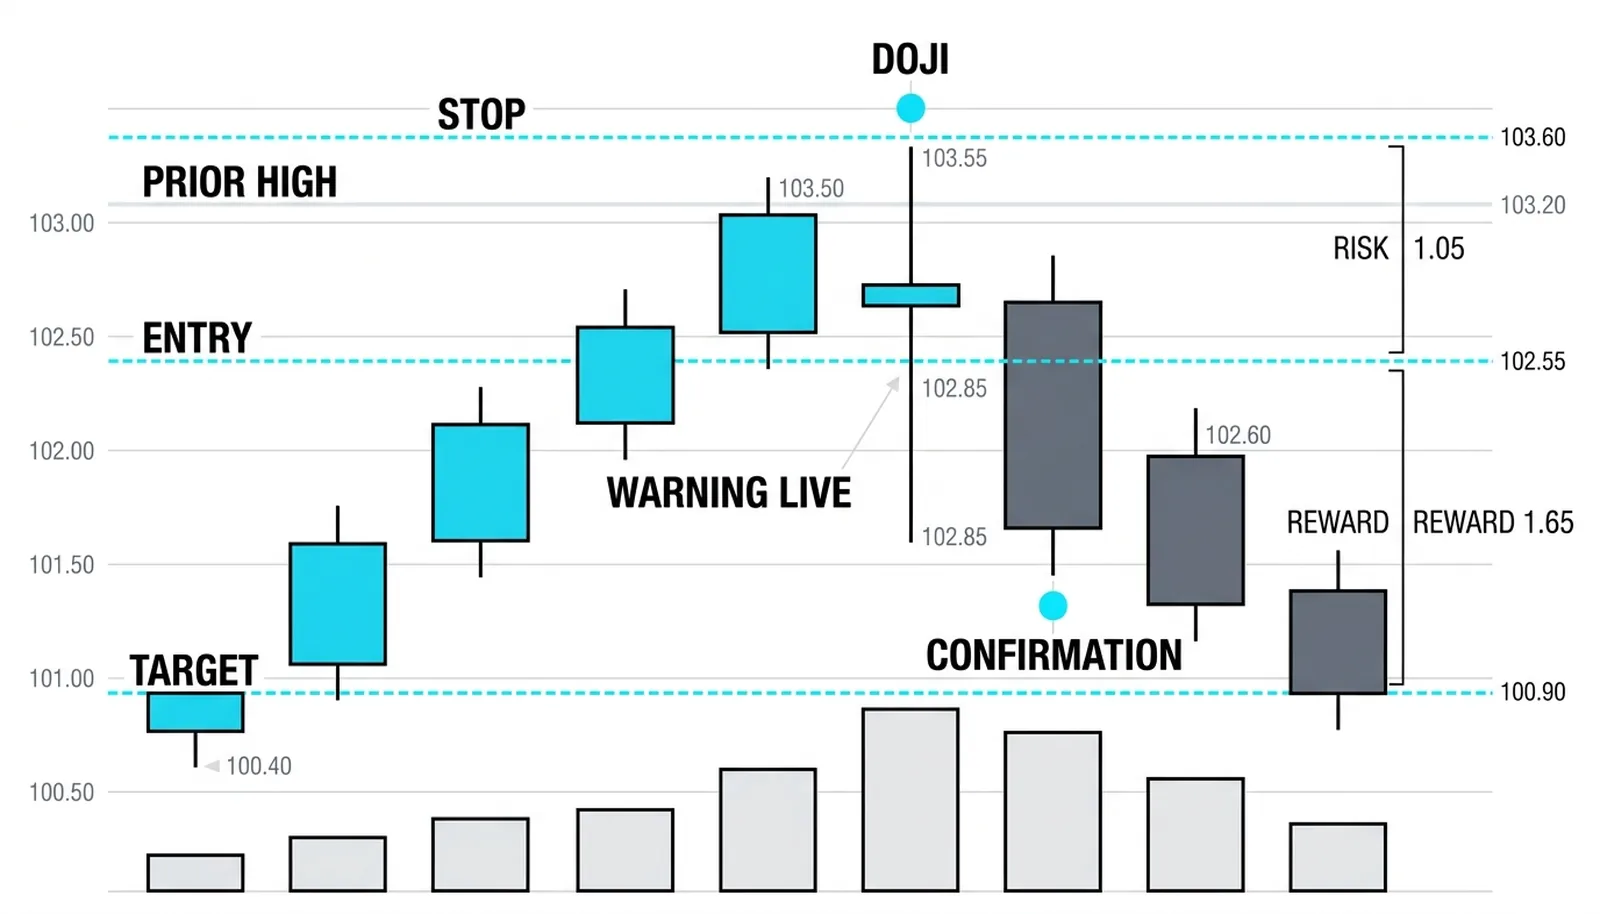
A hypothetical example with round numbers. A stock rallies five straight bars from 100.40 to 103.50, running directly into a prior high that traders have marked for weeks. Tension is present: a strong move, into a known level.
Bar six opens at 103.20, pushes up to 103.55, gets sold down to 102.85, and closes at 103.22. Open and close nearly identical, long wicks on both sides. That is a long-legged doji after a five-bar run, at resistance. Both sides fought and neither finished. The warning is live.
Bar seven opens at 103.05, sells steadily through the session, and closes at 102.60, below the doji's low of 102.85. Confirmation. The stumble became a fall.
The conservative plan shorts the break back below 102.55, just under the confirmation close, with the stop at 103.60, above the doji high. Risk is 1.05 per share. The target is the origin of the rally near 100.90, a reward of roughly 1.65, about 1.6 times the risk. Acceptable, and every number came from the chart.
Now the failed version. Bar seven instead closes at 103.70, back above the doji high. The stumble was recovered within one session, the buyers absorbed the selling, and the warning expired worthless. No trade was taken, because the confirmation never came. The method's edge is exactly there: the market itself filters out half the bad signals before a single unit of risk goes on.
| Doji type | The wick story | The crowd it traps | The confirmation to wait for |
|---|---|---|---|
| Plain doji | Small wicks both sides, a truly even session | Nobody specific; mild hesitation all around | A close beyond either wick, in the direction context favors |
| Dragonfly | Long lower wick, lows rejected and fully reclaimed | Sellers who shorted the breakdown and are underwater | A close above the doji's high |
| Gravestone | Long upper wick, highs reached and abandoned | Buyers who chased the top of the wick | A close below the doji's low |
| Long-legged | Both wicks extended, a violent two-sided fight ending even | Both camps; late buyers and late sellers alike | A close beyond the wick on the side context favors |
Doji Questions, Answered
What does a doji candle mean?
A doji means the session ended in a draw: the open and close landed at nearly the same price, so neither buyers nor sellers finished in control. Its meaning depends entirely on context. After a strong move or at a tested level, it signals that the winning side stumbled and the move may be tired. In a quiet, directionless market, it means almost nothing.
What is the difference between a dragonfly and a gravestone doji?
The difference is which side got refused. A dragonfly has a long lower wick with the open and close near the top: sellers drove the price down and buyers reclaimed everything, a refusal of the lows. A gravestone has a long upper wick with the open and close near the bottom: buyers reached up and were abandoned, a refusal of the highs. One traps sellers, the other traps buyers.
Should you trade a doji by itself?
No. Standalone doji signals test poorly, because roughly half of all stumbles are recovered by the next session. The doji is the warning, and the confirmation bar, a close beyond the doji's extreme in the direction context suggests, is the signal. Enter on the confirmation, place the stop beyond the doji's far wick, and skip the trade when confirmation never arrives.
What does a doji at a top mean?
A doji at a top means the rally's buyers failed to push the close higher for the first time in the move, right where selling pressure was expected. It is a warning of exhaustion, not a guarantee of reversal. If the next bar closes below the doji's low, the warning converts into a tradable short with a defined stop above the doji high. If price grinds higher instead, the warning was false and no trade existed.
The doji family closes the core single-bar patterns in this level, but bars rarely act alone. The next lesson groups them into combinations, showing how two- and three-bar structures around support and resistance carry more weight than any single candle, and how the confirmation habit learned here scales up to those larger shapes.