UTAD: The Upthrust After Distribution
The UTAD, the upthrust after distribution, is the phase C test of a Wyckoff distribution range: a push above range resistance that closes back inside on no follow-through, the fake breakout that traps the last eager buyers at the worst prices of the whole campaign. The classic accumulation and distribution framework treats it as the distributional counterpart of the spring, the same maneuver run at the top of a range instead of the bottom.

It is the cruelest breakout on the chart. The pattern looks like a Potemkin village, a facade built to be inspected, strength painted on the front of a building with nothing standing behind it. The single-bar anatomy of the upthrust itself was covered in the earlier lesson on upthrust bars, and the spring mechanics were covered on the accumulation side, so this lesson stays on the top-side test: where it sits in the campaign, how it is read, and how it is traded.
Why Price Pokes Above the Ceiling
The poke happens because the orders are there. Above an obvious resistance ceiling, two kinds of resting orders cluster: breakout buy orders from traders waiting to join strength, and stop-loss orders from shorts who sold the range and placed protection just above the highs. Professional sellers know exactly where those orders sit.
A quick push through the ceiling triggers both at once. The breakout buyers chase, the short stops fire and become market buy orders, and a burst of demand arrives at the highest prices of the campaign. That demand is the exit liquidity. The large operator who has been distributing inventory for weeks sells the last of it into that burst, at better prices than the range ever offered.
Think of it from the seller's side. Weeks of selling into rallies has thinned the position, but some inventory remains, and selling it inside the range would push price down and hurt the average. One engineered push above the ceiling converts the remaining supply into the best fills of the whole campaign. The buyers who provide those fills are the ones who get trapped.
The Close Back Inside Is the Verdict
After the poke, the chart offers a two-path fork, and the close decides which path the market took. Path one: price closes back below the ceiling, inside the range, and the next one to three bars refuse to trade back above the highs. That is the UTAD. The breakout failed, the buyers are trapped, and their eventual selling becomes fuel for the markdown.
Path two: price closes above the ceiling and holds there, building a shelf of acceptance above the old resistance. That is a genuine breakout, and the distribution read is wrong. The tell is never the poke itself. The tell is what the next one to three bars refuse to do.
On volume, be honest with yourself. The poke can print very heavy volume because breakout buyers are chasing, and that alone does not disqualify anything. Heavy volume that fails to hold is evidence of absorption: supply met all that demand and price still could not stay up. A heavy poke that fails actually leaves more buyers trapped than a quiet one, which means more fuel for the decline. What decides the read is the close back inside and the absence of follow-through, not the size of the volume bar.
Trading the UTAD
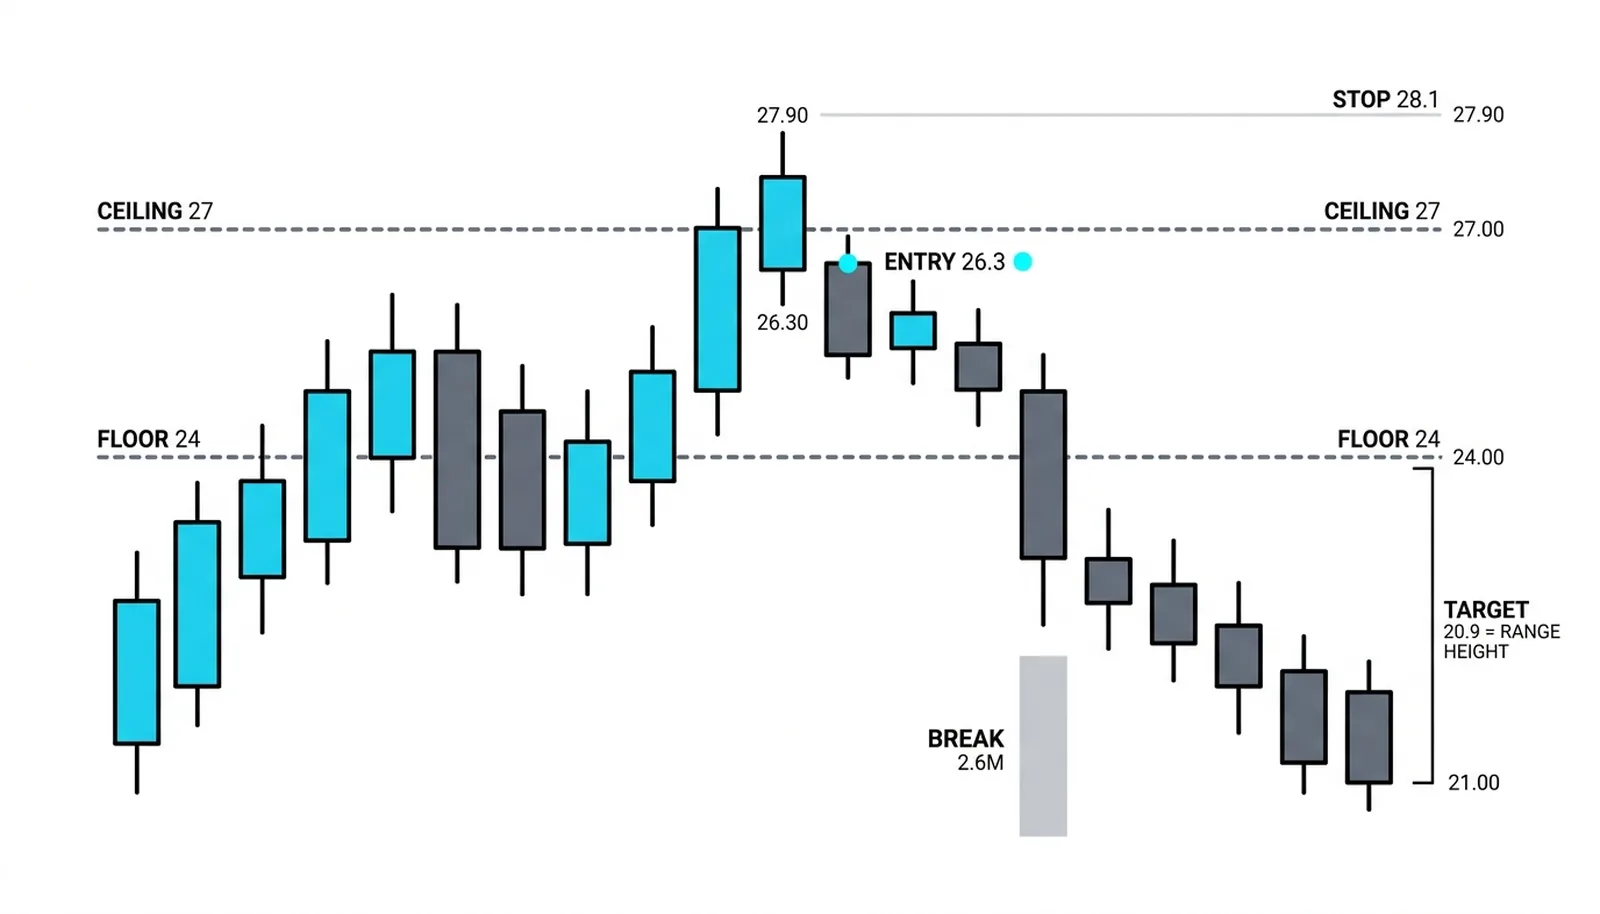
The short entry comes on the close back below the ceiling. Not during the poke, not on anticipation, on the close that confirms price is back inside the range. Entering earlier feels clever and gets traders run over by the very breakout orders the setup depends on.
The stop sits above the UTAD high. This is what makes the trade structurally clean: the invalidation is explicit. If price takes out the high of the failed breakout, the trap has failed and the trade idea is dead, so the stop can sit tight, often just a small buffer above that high. Defined risk, close by, against a target measured in range heights.
The target comes from the law of cause and effect in the Wyckoff method. The range is the cause, the markdown is the effect, and the height of the range projects a minimum objective measured down from the breakdown of the floor. A three-point range argues for roughly three points of decline once the floor gives way. The trader is not predicting; the trader is being paid for identifying where the trapped inventory sits.
When the UTAD Fails
Sometimes the poke is real. Price closes above the ceiling on heavy volume, the next bars hold above it, and the breakout builds. That is a failed UTAD, and it carries clean information: the demand was genuine, the buyers were not trapped, and the bear campaign is cancelled.
The honest response is to step aside, or to flip bias entirely if the hold persists. The method is not broken by a failed signal. A test that can fail is a test that means something. The trader who refuses the evidence and shorts a confirmed breakout is no longer reading the chart, just defending an opinion.
One Poke, Measured
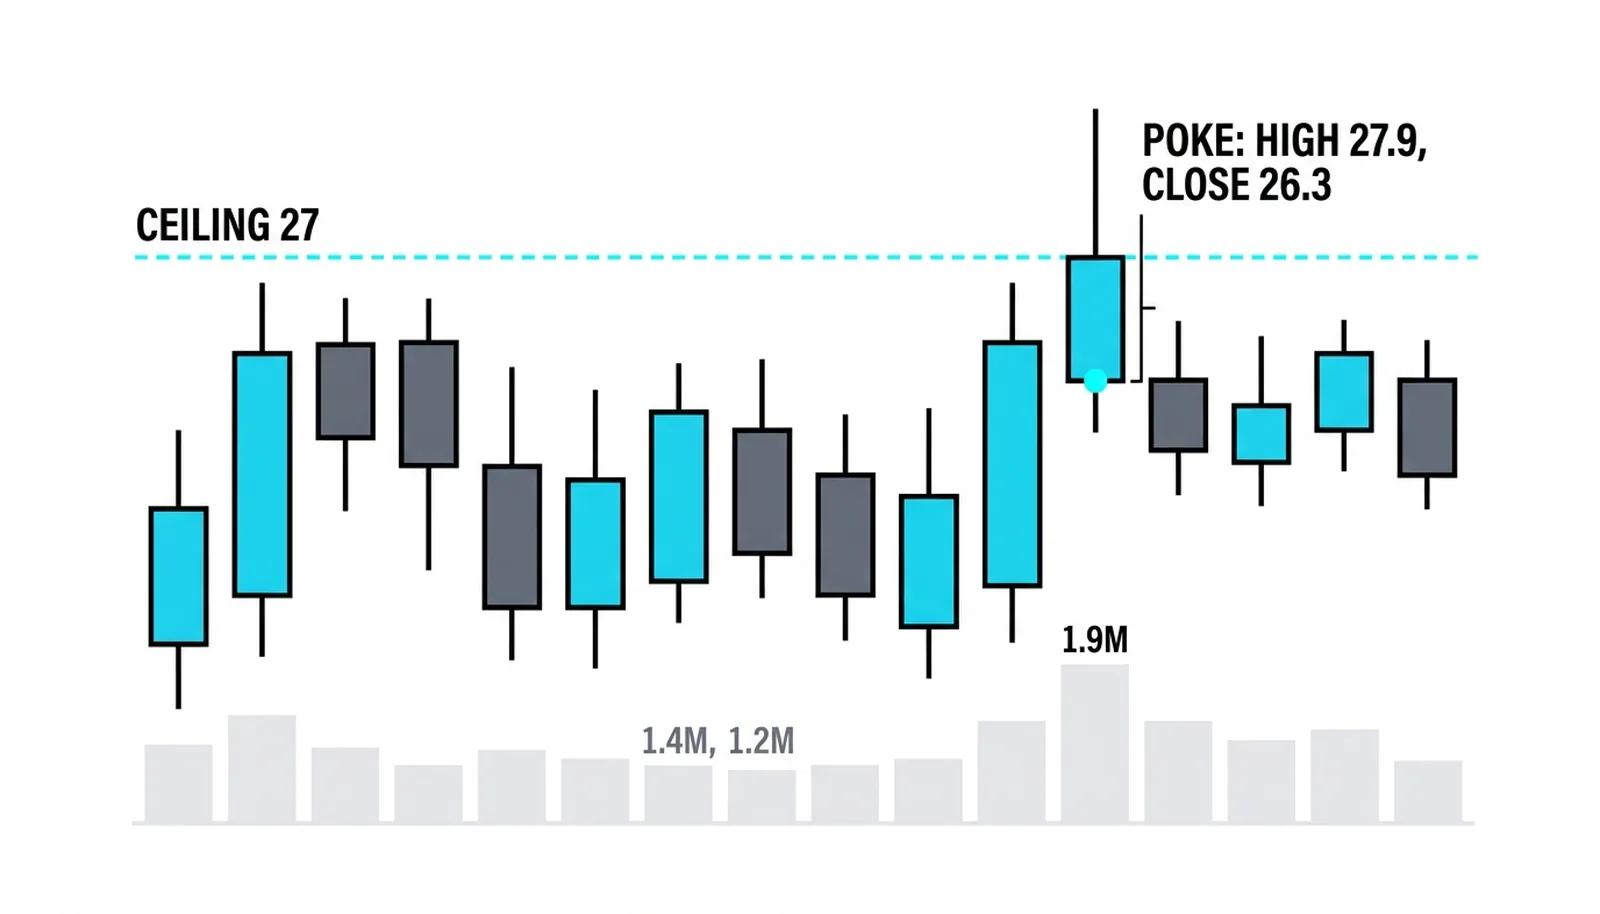
All figures here are invented round numbers for illustration. A stock rallies from 17 to 26.8, then ranges between 24 and 27 for three months on average volume of 1.2 million shares. Rallies to the top of the range arrive on shrinking volume: 1.4 million, then only 1.2 million. Demand at the highs is thinning.
Then the poke. The stock opens at 26.5, breaks the ceiling, and prints a high of 27.9 on 1.9 million shares, well above average. It closes at 26.3, back inside the range. The next three bars drift between 25.8 and 26.6 on 0.9 to 1.1 million and never trade above 27. No follow-through. The UTAD is confirmed.
The short entry reads 26.3 on that close back below the ceiling. The stop sits at 28.1, above the UTAD high, for a risk of 1.8 points. The range floor at 24.0 breaks at 23.9 on 2.6 million shares, and the range height of 3.0 points projects a target of 20.9, which fills within two weeks. Risk 1.8 to make 5.4, with the invalidation defined before entry.
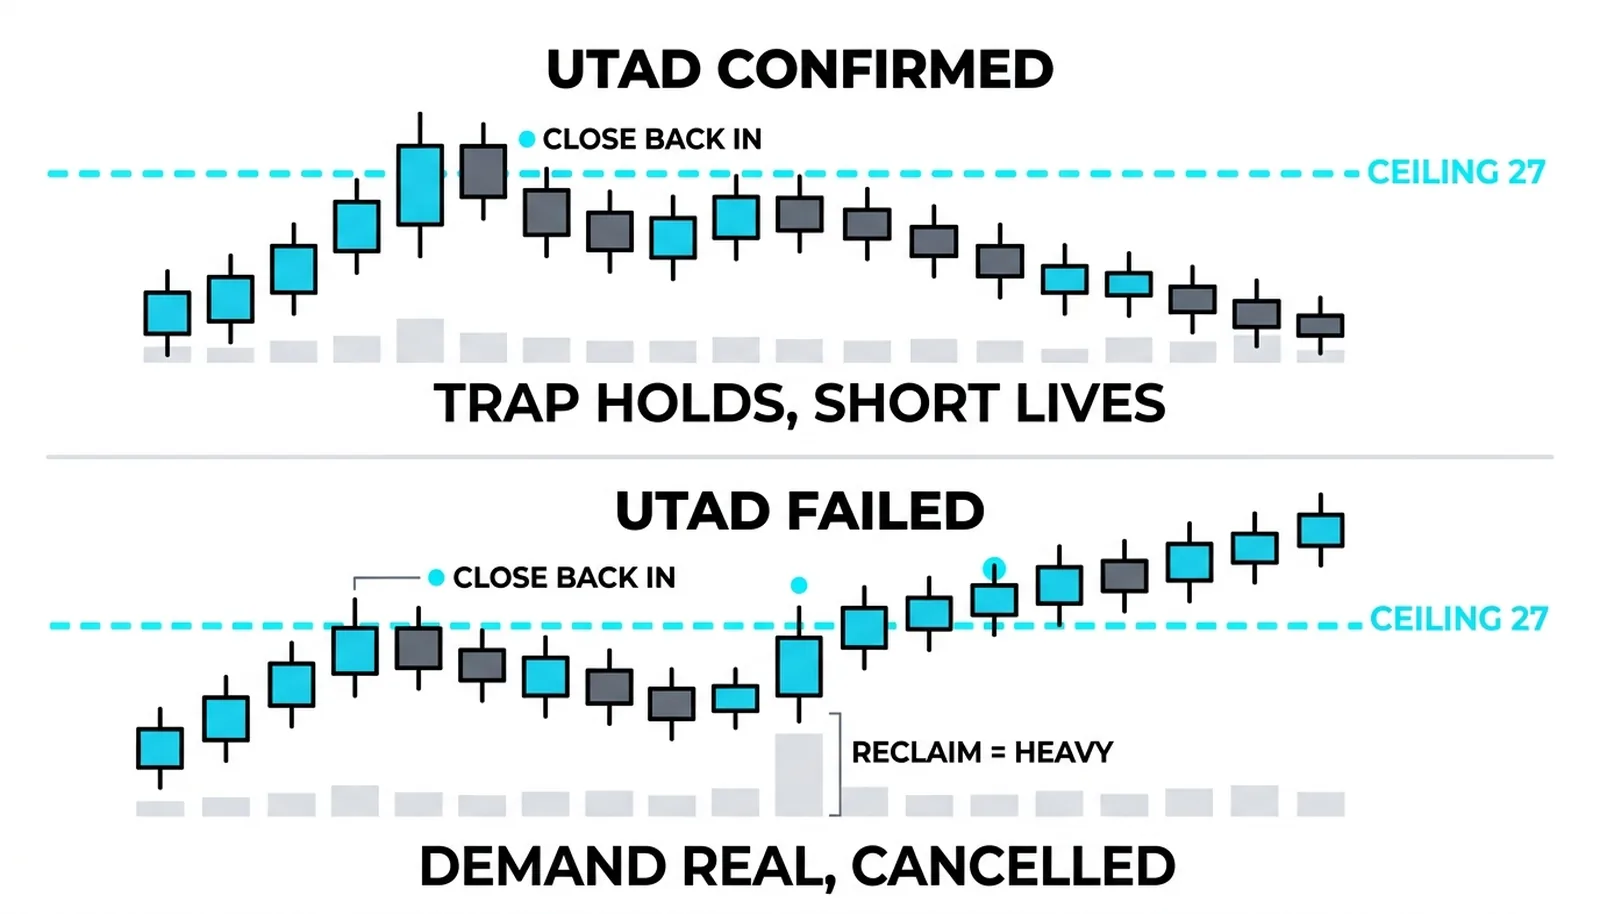
What would have cancelled it: a close above 27 that held, or any of the next three bars accepting above the ceiling. Either one says the demand was real and the trade never happens.
| Moment | Price | Volume | The Read |
|---|---|---|---|
| The poke | High 27.9 | 1.9M | Breakout buyers and stops triggered above the ceiling |
| The close back inside | 26.3 | 1.9M | Heavy demand absorbed, UTAD confirmed, short entry |
| The quiet drift | 25.8 to 26.6 | 0.9 to 1.1M | No follow-through, trapped buyers confirmed |
| The breakdown | 23.9 | 2.6M | Floor breaks, markdown begins, target 20.9 active |
UTAD, Answered
What is a UTAD in Wyckoff analysis?
A UTAD is the upthrust after distribution, the phase C test of a distribution range where price pushes above resistance, fails, and closes back inside. The classic accumulation and distribution framework frames it as the mirror of the spring on the accumulation side: the final trap before the markdown, designed to catch the last buyers at the worst prices.
What is the difference between an upthrust and a UTAD?
An upthrust can occur anywhere inside a range, while the UTAD label points to the late, decisive one that arrives after most of the distribution has already happened. Authors use the terms loosely, so read the address and the aftermath rather than arguing labels: where in the campaign it appeared, and whether price followed through.
What volume confirms a UTAD?
No single volume reading confirms it. Heavy volume on the poke is common because breakout buyers are chasing, and it is not disqualifying; heavy volume that fails to hold is absorption. The confirmation is the close back inside the range plus one to three bars that refuse to trade back above the ceiling.
Where does the stop go on a UTAD trade?
The stop goes above the high of the UTAD bar, with a small buffer. A move through that high means the failed breakout has itself failed, the trap did not work, and the short thesis is invalid. That explicit invalidation is what allows the stop to sit tight against a target measured in full range heights.
Once the upthrust is read and the markdown begins, the campaign enters its final acts: the signs of weakness, the last point of supply, and the breakdown itself. Those phases carry their own volume signatures, and the next lessons take them in order.