The No Supply Bar, Explained
A no supply bar is a down bar with a narrow spread on clearly low volume, usually appearing on a pullback, and it means professional sellers are absent, the decline has no real selling behind it, and supply has dried up at that price. Price fell, but almost nobody participated in the fall.

That combination changes everything about how you read the bar. A decline that nobody is selling into is a decline coasting on nothing. Think of the last ferry leaving the dock: however much you want to cross, there is nothing left to board. The market can drift lower on thin interest, but it cannot keep falling without sellers actually showing up.
The previous lesson split bars into up bars and down bars and showed how volume decides which ones carry weight. The no supply bar is the special down bar where low volume and a narrow spread flip the meaning of the entire decline.
The Anatomy of a No Supply Bar
Three parts must be present at the same time. Miss one and you are looking at an ordinary down bar.
First, the bar closes down. The close sits below the open, or at least below the prior close. The bar is nominally bearish, which is exactly why the quiet volume matters so much.
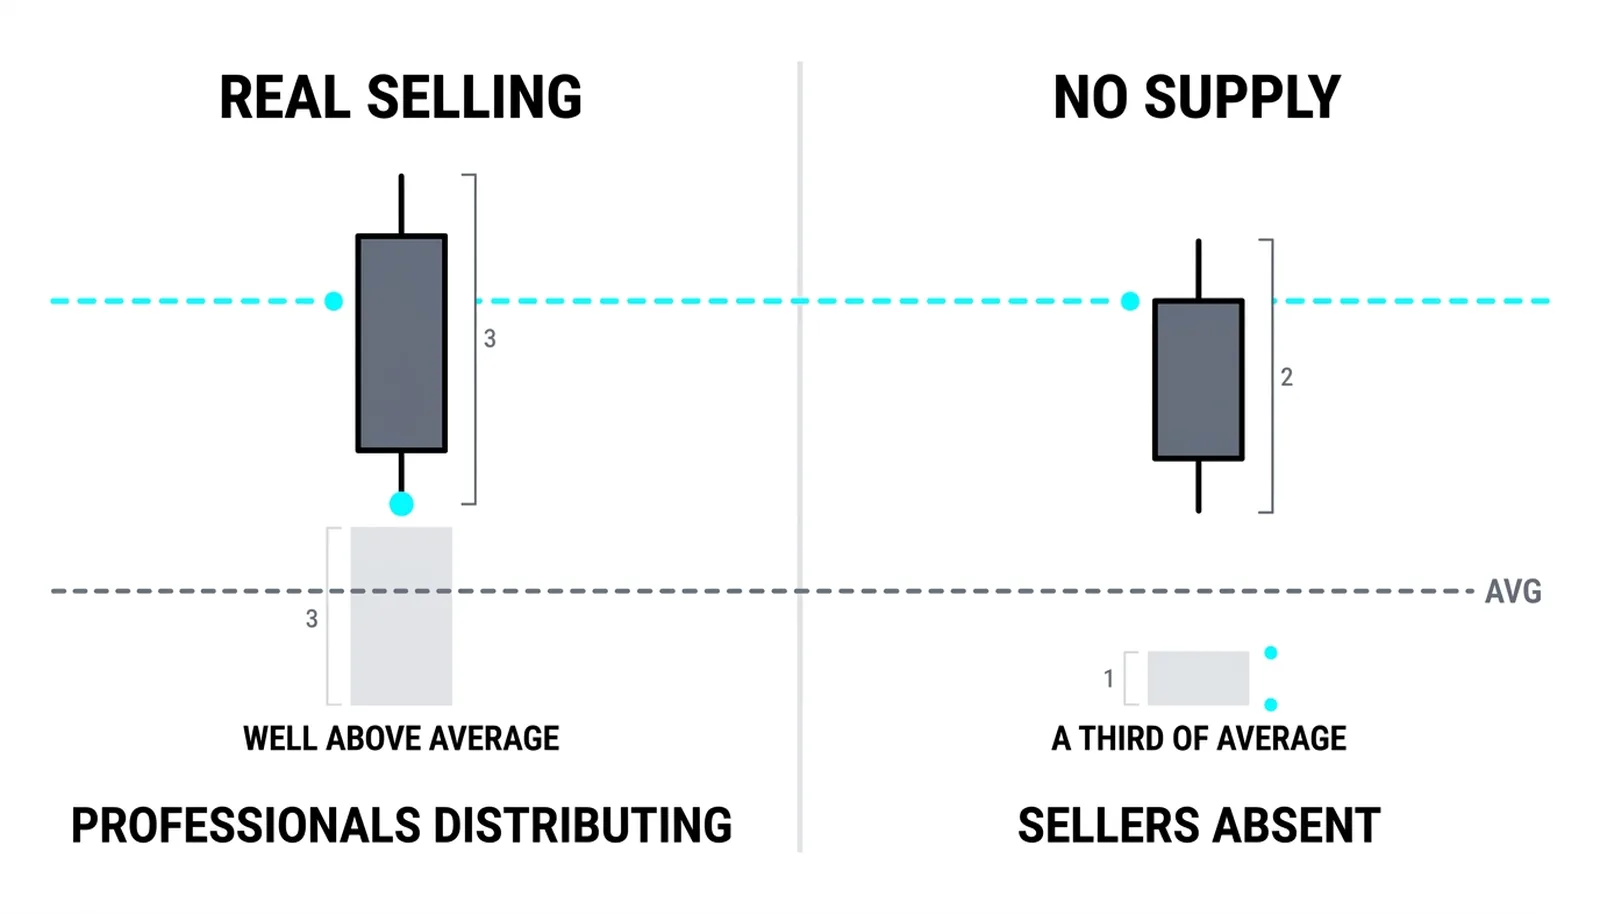
Second, the spread is narrow. The distance from high to low is small compared with recent bars on the same chart. A wide spread on a down bar suggests active disagreement and real selling pressure. A narrow one says the price barely traveled.
Third, volume is clearly low. Not slightly below average. Clearly below the bar's own recent average, often among the lowest readings of the last several sessions. This is the core of the signal.
Location adds the fourth, softer condition. The strongest no supply bars print at or near support, on a pullback within an uptrend, or down into a prior reaction low. Context is what separates evidence from noise.
Why Absence Is Information
Most traders scan charts for presence: big bars, heavy volume, obvious moves. Volume spread analysis pays equal attention to absence, because absence tells you who is not acting.
If professional money wanted out at these prices, the decline would show it. Selling from large holders produces wide spreads and heavy volume, because big positions cannot exit quietly. A down bar on thin volume means the professionals are not selling into this move.
So who moved the price down? Small orders, scattered profit-taking, and the natural drift of a market with no bids nearby. That kind of decline carries nothing. It stops the moment real buyers appear, and sometimes it stops on its own.
Frame the pullback as a test. The market dips toward support to find out whether supply waits there. The quiet bar is the test passing: price probed lower, and no sellers answered.
Absence is evidence, but it is weak evidence on its own.
Confirmation Comes After
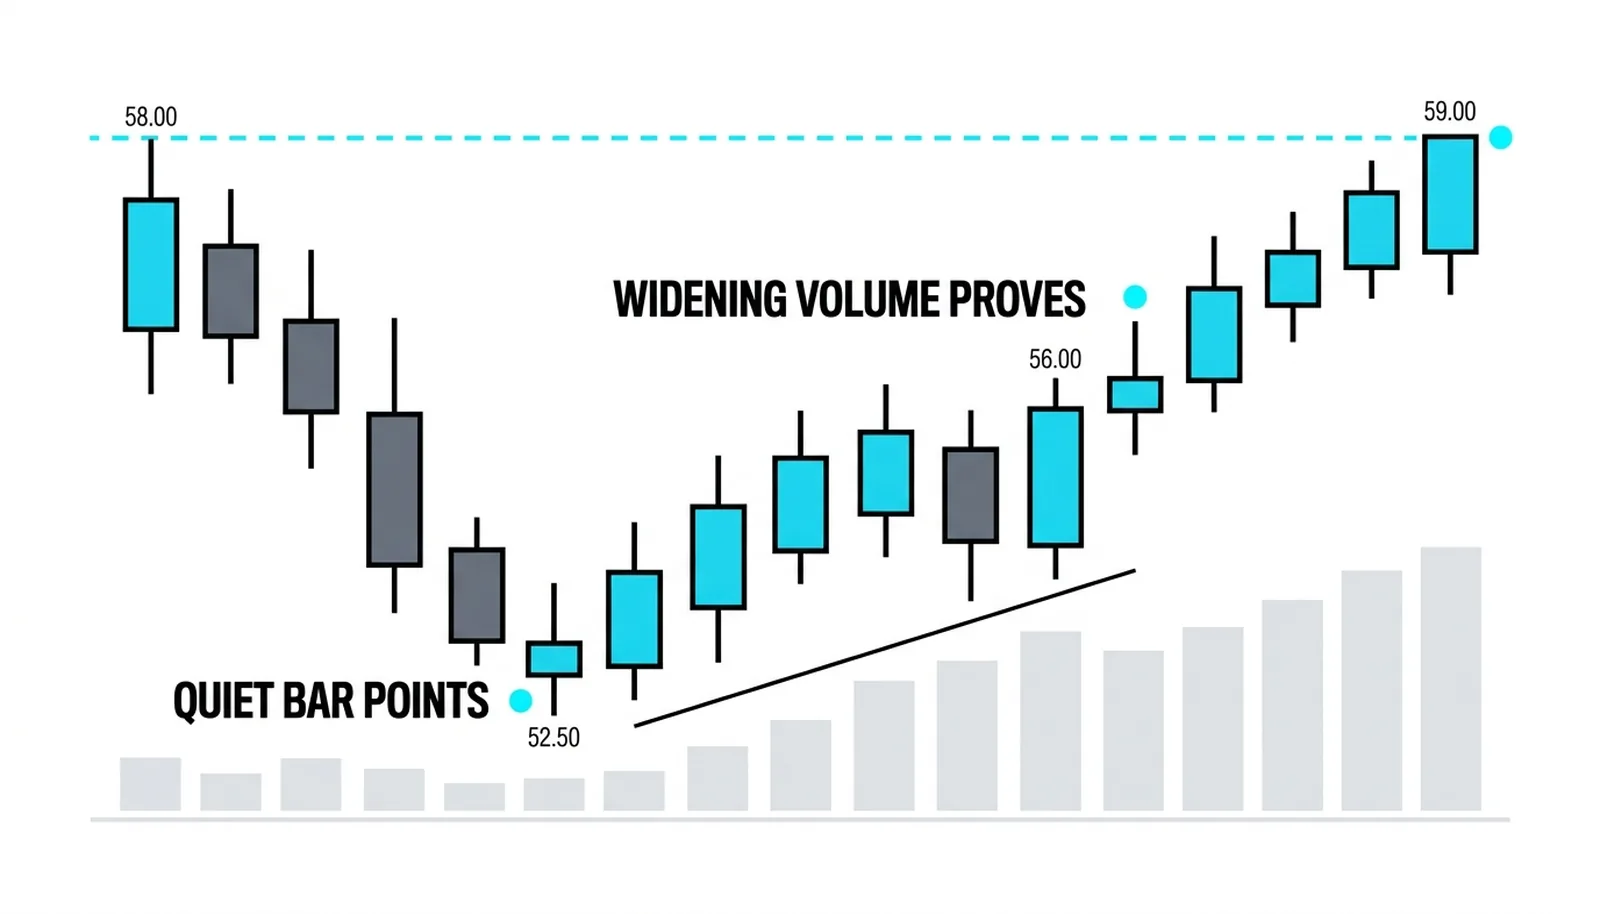
The no supply bar points. The next bars prove.
What you want to see after a no supply bar is a rally on widening volume. Price lifts off the level, spreads expand to the upside, and volume builds bar over bar. That sequence tells you buyers stepped in where sellers were absent, and the pullback is being absorbed.
A rally on weak volume after a no supply bar is a half-signal. It does not contradict the read, but it does not confirm it either. You wait for demand to show itself the way supply failed to.
A quiet bar is an invitation to watch, not a license to buy.
Traders who buy the no supply bar itself are front-running the confirmation. Sometimes that works. Often it means sitting through another leg of drift before the market decides. The patient version of the trade waits for the up bar on rising volume, then enters with the low of the no supply bar as the reference for risk.
When the Read Fails
The failed version of this pattern is specific, and you should know it in advance.
If the market returns to the same area on heavy volume and falls through the level, supply was never absent. It was resting. The first quiet bar simply caught sellers between decisions, and the heavy return proves they were there all along. The bullish read is dead at that point, and holding onto it is how small losses become large ones.
Context weakens the pattern before it even forms. A no supply bar inside a fresh downtrend is weak evidence, because thin volume on the way down can mean buyers have stepped aside, not that sellers have finished. The pattern earns its meaning on pullbacks within an established uptrend, pressed into support or a prior reaction low.
One more failure mode deserves attention: repeated low-volume declines that never rally. A market that drifts lower day after day on quiet volume is not absorbing supply. It is leaking. Absorption ends with a response from buyers. If no response comes after several quiet down bars, the correct read is disinterest, not hidden strength.
One Pullback, One Quiet Bar
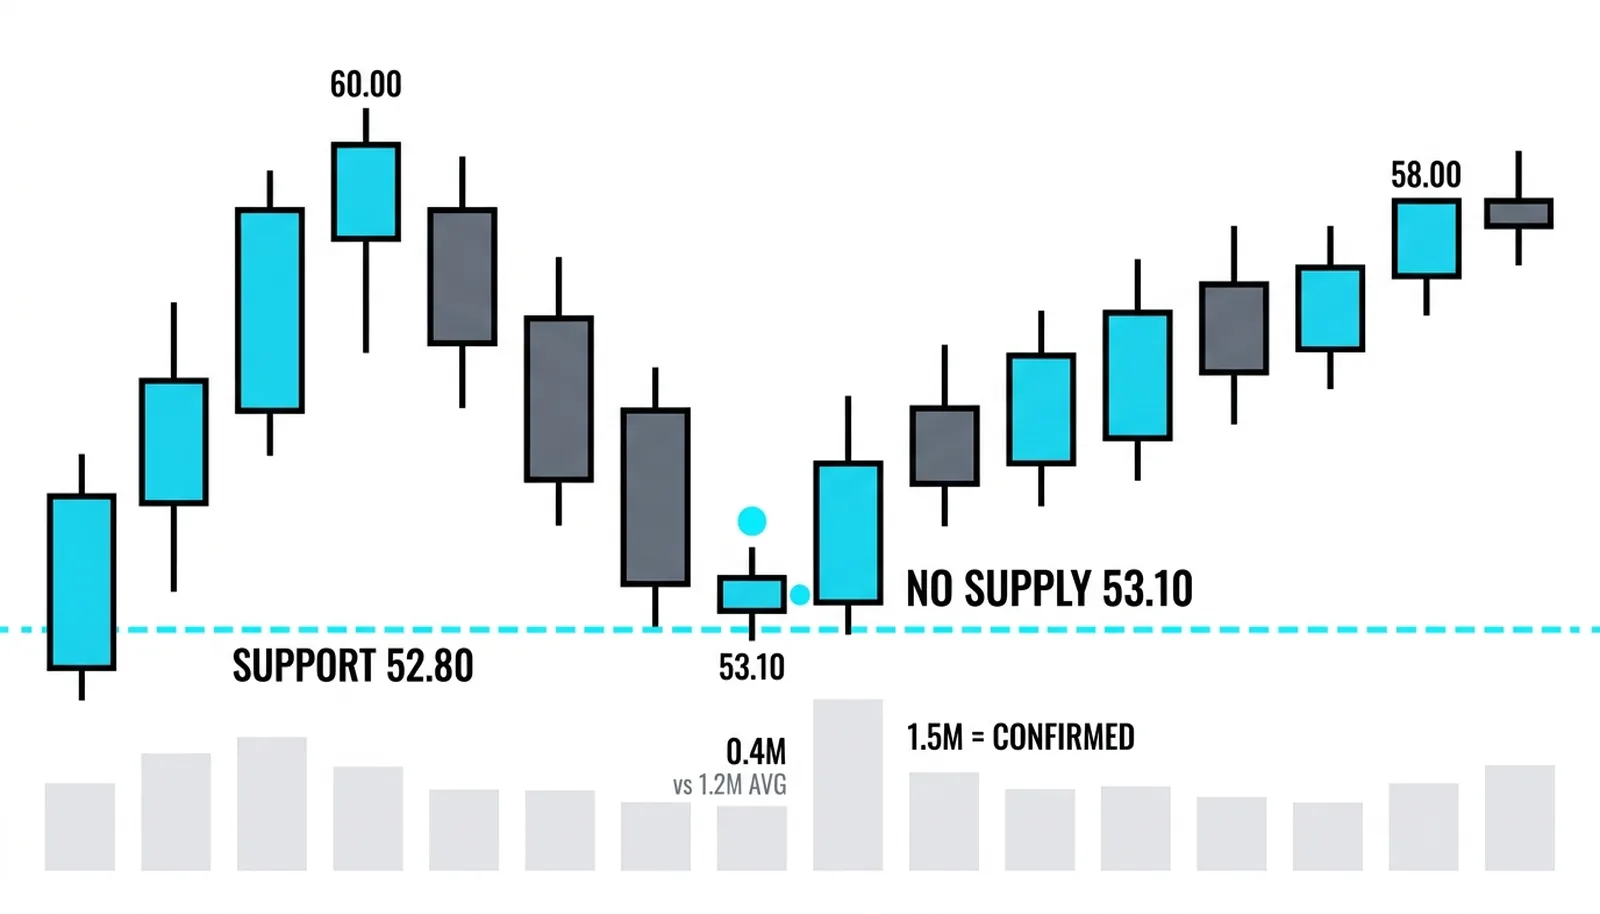
Imagine a stock in a clear uptrend, all figures hypothetical. Price reaches 60, then pulls back toward prior support at 52.80, a level where buyers stepped in on the last reaction.
On the third day of the pullback, the bar closes down at 53.10. The spread from high to low is 0.7, noticeably narrow against recent bars that have been traveling 1.5 to 2.0. Volume prints 0.4 million shares against a 20-day average of 1.2 million.
| Element | This Bar's Reading | Why It Matters |
|---|---|---|
| Spread | 0.7, narrow versus recent 1.5-2.0 | Price barely traveled; no aggressive selling pressure |
| Volume | 0.4 million versus a 1.2 million average | Professionals are not participating in the decline |
| Location | Closing at 53.10, just above 52.80 support | The test is happening exactly where supply should appear if it exists |
Read together: a down bar, a narrow spread, volume at a third of average, sitting on support. That is a textbook no supply bar.
The next session, price rallies and closes higher on 1.5 million shares, well above average. That is the confirmation. Buyers responded where sellers were absent, and the uptrend resumes from there.
Now the kill condition. If instead the market had returned to 52.80 on heavy volume, say 1.8 million shares, and closed through the level, the read would be void. Supply was present after all, the level failed, and the correct action is to stand aside or exit, not to argue with the bar.
Notice what the sequence required: the quiet bar identified the possibility, the heavy up bar confirmed it, and the heavy down bar would have destroyed it. Volume decided each stage.
The next lesson covers the mirror image of this pattern, the no demand bar, where the same logic works in reverse at the top of a move.
The No Supply Bar, Answered
What is a no supply bar in trading?
A no supply bar is a down bar with a narrow spread on clearly below-average volume, typically appearing on a pullback. It signals that professional sellers are absent and that supply has dried up at that price, which is why the decline lacks force.
How is it different from a normal down bar?
A normal down bar on average or heavy volume shows active selling and carries bearish weight. A no supply bar shows a decline nobody participated in, which flips the interpretation from bearish to quietly constructive, provided the context is right.
Where should a no supply bar appear?
It carries the most weight on a pullback within an established uptrend, at or near support or a prior reaction low. The same bar inside a fresh downtrend is weak evidence, because thin volume there can mean missing buyers rather than missing sellers.
What confirms a no supply bar?
A rally on widening, above-average volume in the following bars confirms it, showing buyers responding where sellers were absent. A return to the level on heavy volume that breaks through it invalidates the read completely.